Our office supplies are sometimes scattered almost everywhere; you can see a pair of scissors in our bedroom, a double-sided tape on the dining table, a few pens in a mason jar, or a glue on a fridge. It's such a mess, I know, so when we had an empty Zesto-O box available, I decided that it's time to give our office supplies a permanent "shelter". :D
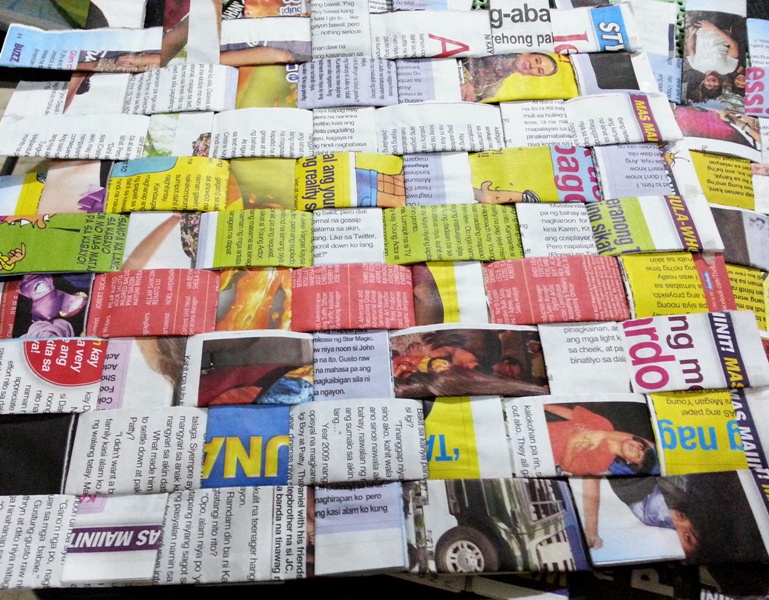
I used old magazines to cover the box, and what I did was make the covers look like they had been woven. Take a look at one of them:
By the way, I used glue to secure the pages while "weaving" each of them.
I don't have a photo of the Zesto-O box, but I assume that you're aware of how it looks like. :)
This is an easy DIY project, because you already have a ready-made box; all you need to do is to cover it with something nice to make it look presentable. Remember that this is something that other people will see inside your home, so make it look pretty decent looking, if not extremely decent looking.
Here's the recycled Zesto-O box, and it's always within my reach because here lies some of our important stuff. We have post-its, pens, small notebook, scotch tape, double-sided tape, a few Elmer's glue, label stickers, scissors, stapler, and more. Yeah, they all fit in this box.
You're free to put some decors if you wish. I attached that huge fabric flower that came with the long beaded necklace I've never used.
Boxes and old magazines can be recycled. With a little bit of creativity, you can come up with something that can be of use to declutter (and beautify) your happy home. Additionally, recycling is good for our Mother Nature, so try to be good and sweet by recycling and reusing what you can. :)
Xoxo,
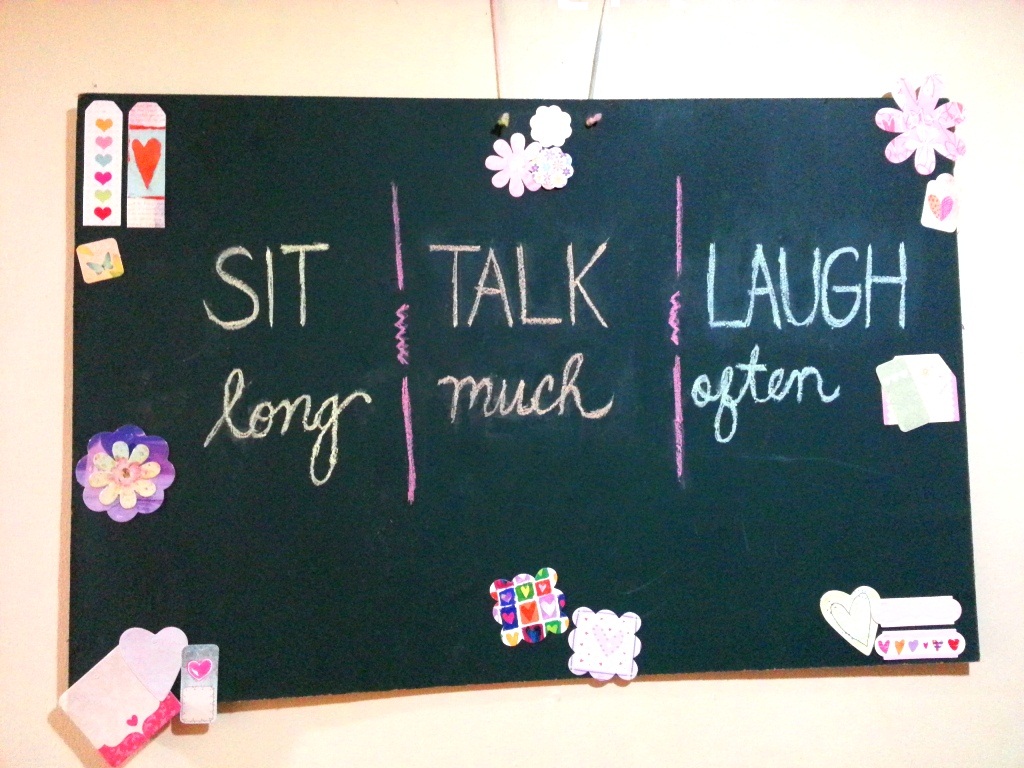
It's now time for me to put something on the wall, particularly in the dining area, so I decided to purchase a chalkboard, colored chalks and scrapbook embellishments to decorate the board. My main goal for our dining area is to have a splash of colors (which made me purchase pastel-colored placemats), so here's what I did with the chalkboard:
Please bear with my handwriting; I know that it kind'a ruined the beauty of the chalkboard, but Anton's handwriting is worse than mine, so I had no choice, but to write on it myself. Nevertheless, I find the quote really suitable for any dining area. These things actually are what I would like us to do whenever we sit down to eat. Each week, though, I'd write different quotes on this board to keep us inspired. :)
I'm almost done with the other DIY project I'm creating, so I'll keep you guys posted.
Xoxo,
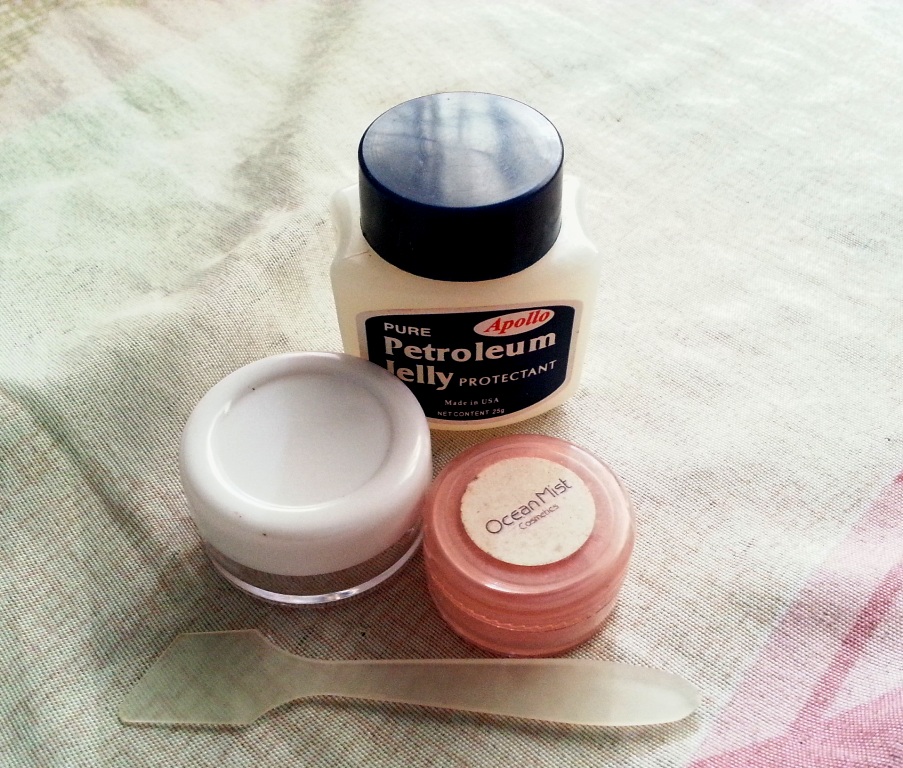
This is very basic, meaning anyone can do this in just a couple of minutes. All you need is a petroleum jelly, which, by the way, helps prevent chapping and drying of lips, a blush or eyeshadow in powder form, mini spatulas for mixing, and a small container for the mixture itself.
You see, I have tons of mineral makeup (used and unused), so the minute I decided that I want to try this out, I was able to prepare everything I need immediately. I also have petroleum jelly available, as well as a couple of small containers and mini spatulas.
Simply combine petroleum jelly and your blush/eyeshadow makeup, and be sure to mix them well.
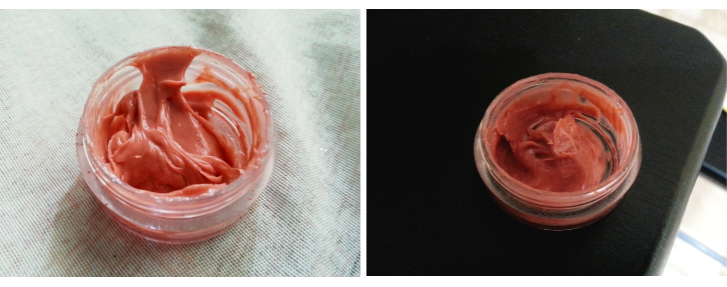
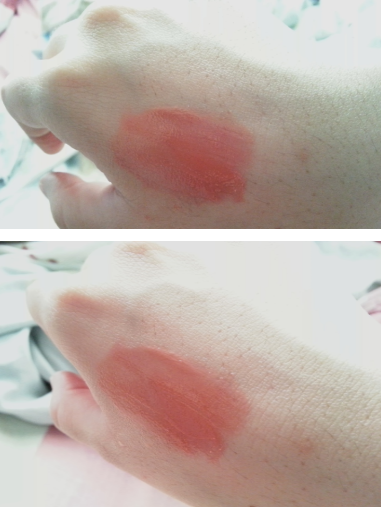
Here it is! Also, don't forget to clean the edges of the container.
It appears to be red orange in color, but take a look at the actual shade when applied. I just love how subtle the color is!
And best of all, I love how it's going to make my lips uber soft 24/7! :D
It makes a wonderful gift for your dear mom, sisters and girl friends. You can put a cute, personalized label on the lid, or you can also tie a nice ribbon around the container.
This project is so addicting! Aside from the fact that it can be done in less than 10 minutes, you get to experiment on a lot of colors, plus your lips are sure to look super luscious throughout the day (and night)!
Xoxo,
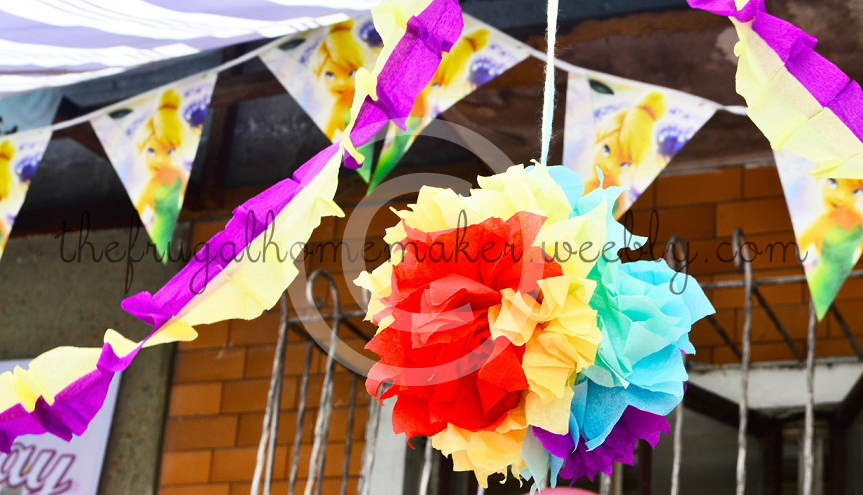
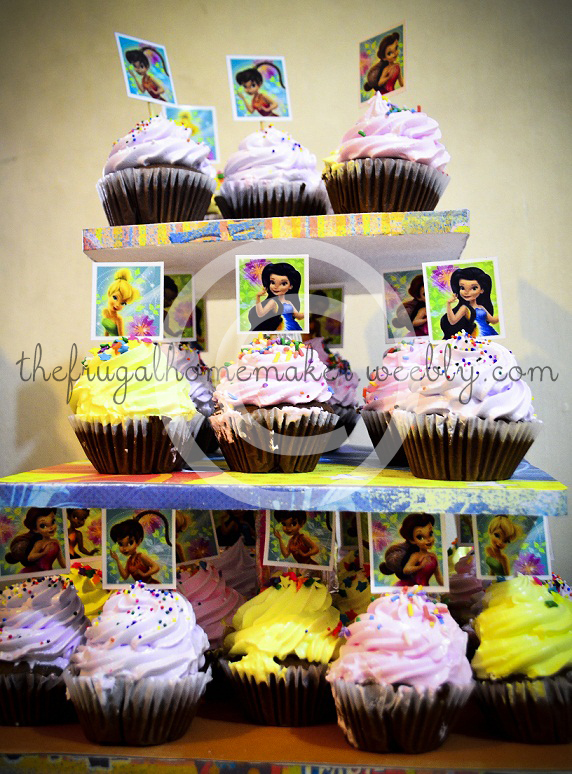
I was busy (and thrilled) for a few days last week making a cupcake tower/stand, cupcake topper and paper garland for Makiko's, our dearest niece, 1st birthday party. I must say this was quite a challenge for me because I have never made any party decoration before...ever! I wanted to make these DIYs almost perfect, if not perfect, as these are some of the things that a lot of people will be seeing at the party.
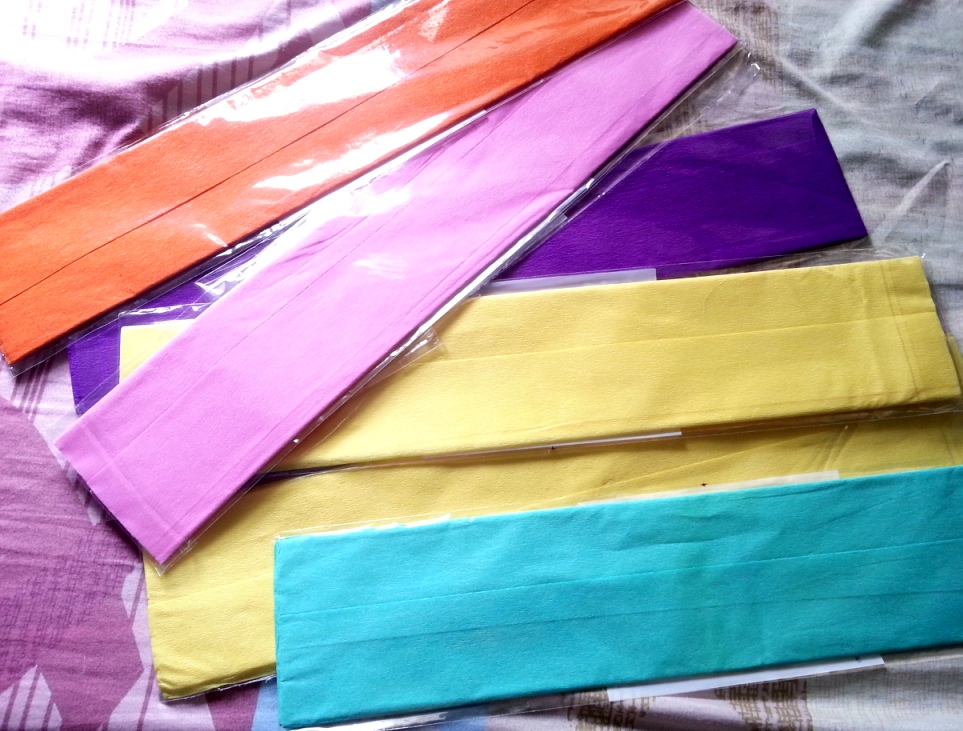
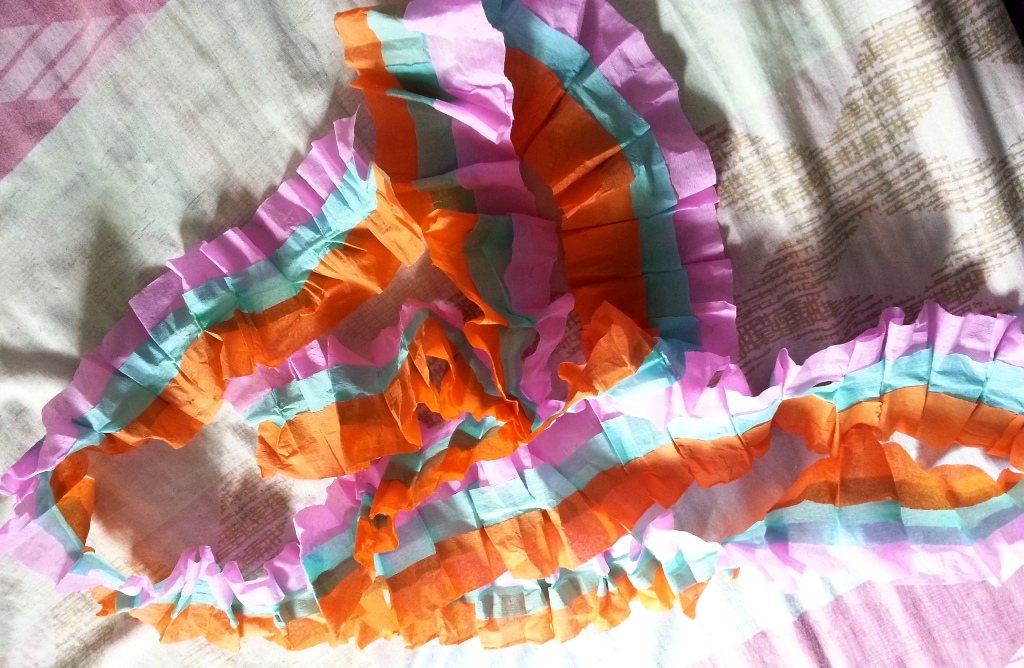
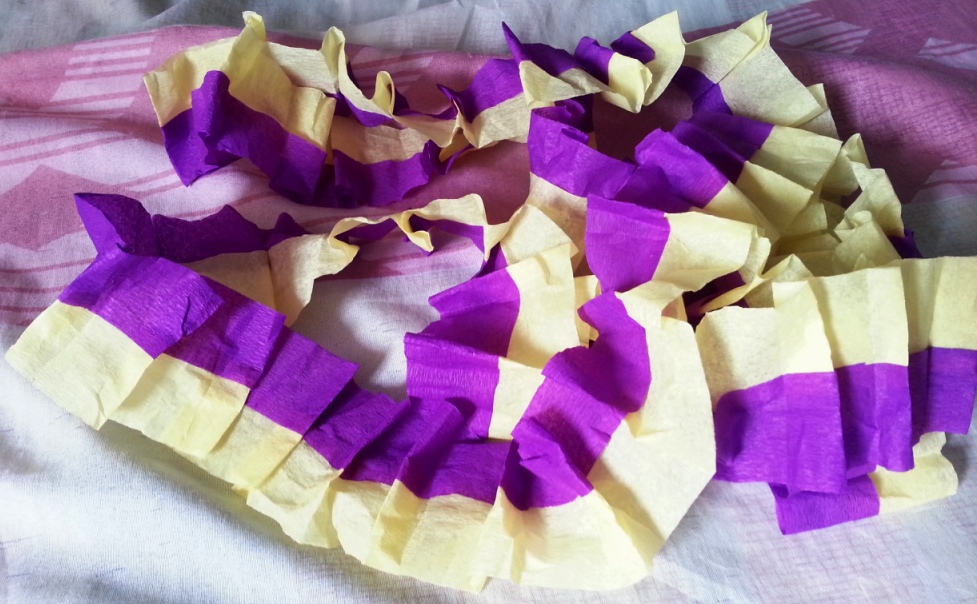
Let's start with the paper garland. Here, I used crepe papers in various colors, scissors and double-sided tape. I wanted to make the garlands colorful, so I chose these colors: I didn't intend to create the usual paper garland that is straightly hung on the wall; I want it ruffled! Most of the people who made ruffled garlands (be they fabric or paper) utilized a sewing machine to create that "ruffled/pleated effect", so I thought this was going to be a one, big problem for me. After a few minutes of brainstorming on my own, I've decided to use a double-sided tape to create pleats. Sorry I wasn't able to ask Anton to take a picture of me forming the ruffles, but to give you an idea, what I did was I folded the crepe papers continuously until I came up with numerous small pleats/ruffles, and here's the outcome:
I am so hoping that you got the gist, people. :)
This is very time consuming compared to when a sewing machine is used, so if you want to create something like this, I strongly suggest that you give yourself ample time to get a couple of them done. I tried to use glue to keep those ruffles in place, but it wasn't sticky enough, so this is another reason for me to love double-sided tape even more! :D
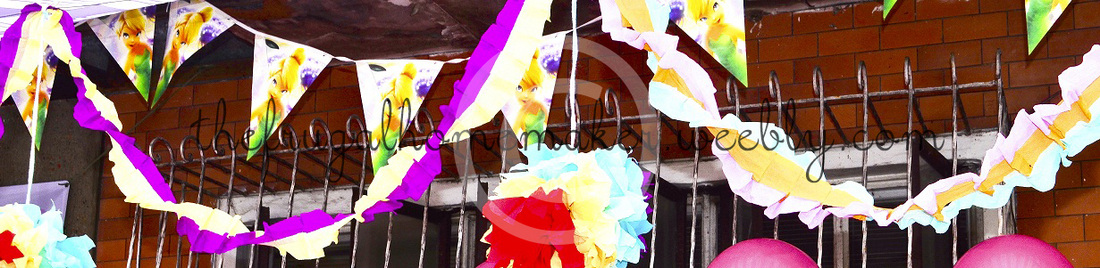
Here's how the garlands looked like when they were hung:
That beautiful pompom, by the way, wasn't created by yours truly; it was made by Anton's eldest sister who happens to be very creative as well. :)
Moving on to the next one, which is the cupcake tower. Anton and I gave 30 pieces of cupcakes for the little princess as a birthday present, and since we both find cupcake tower kits and ready-made stands a bit expensive, we decided to create one ourselves. I definitely won't take the full credit here, as hubby dearest was the one who did most of the work to get this thing done.
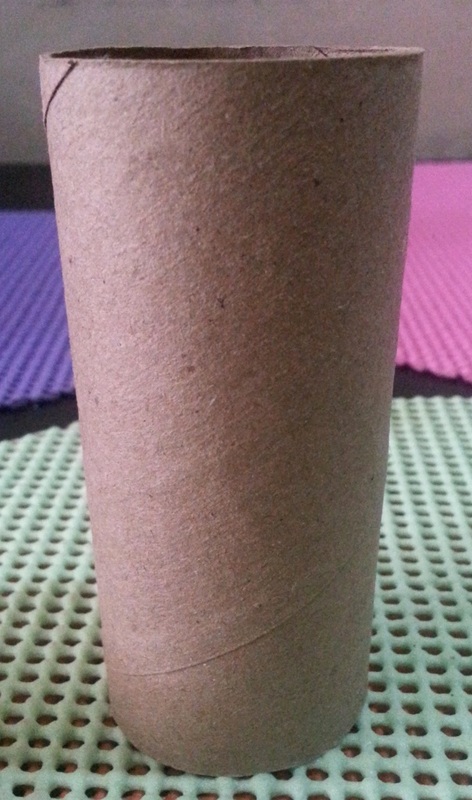
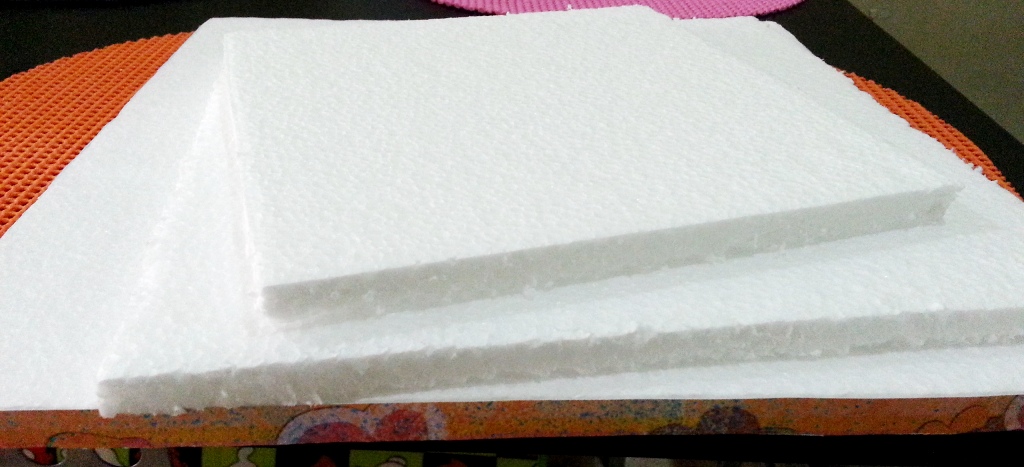
We used square-shaped styrofoams and a few scrapbook papers to cover it. As for the stand that will support the tower itself, we used toilet paper tubes and aluminum foil to cover them, and of course, this will never be a cupcake tower without the scissors and the ever-useful double-sided tape.
Anton cut the styrofoams in 3 different sizes before covering them entirely with scrapbook papers. As you can see, the edges of the biggest styrofoam already has a cover, and obviously, I did the same thing with the other 2. I then covered the top portion with scrapbook papers before Anton slightly, yet firmly embedded the foil-covered toilet paper tubes underneath the 1st and 2nd layer of the styrofoam.
Have a look at the final outcome:
Please note that since we used toilet paper tubes as support, this wasn't as sturdy as we expected it to be, so if you want something that's hard wearing, you can use something else except toilet paper tubes. We had no issues with the styrofoam itself; the only problem we had was when somebody meddled with the tubes, which made the cupcake tower a bit more challenging. Nevertheless, it still looks cute and presentable, and we were able to put all the cupcakes in each layer without collapsing.
One more tip: measure how tall your cupcakes are going to be before you make a cupcake stand. In our case, we didn't have any clue that the icings on top are about an inch tall, plus we still have cupcake toppers that will be placed above the icing. We're still lucky, though, that the tower we made was adjustable. As first-time makers of cupcake stand, our creation, I must say, is good, and it did serve its purpose well!
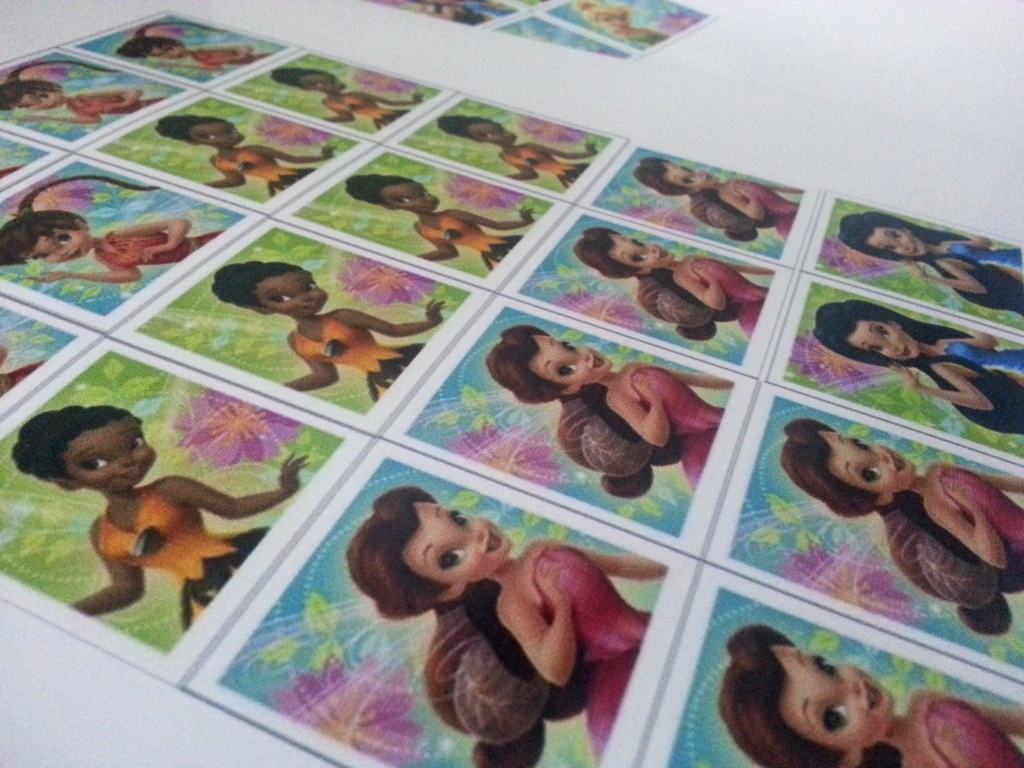
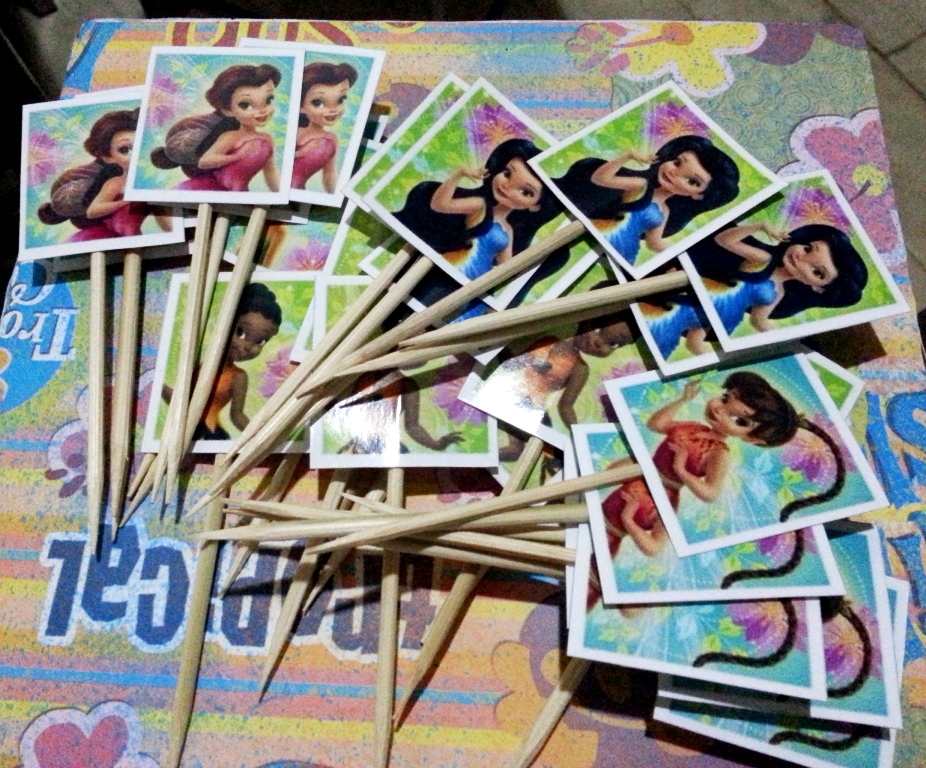
Finally, I want to show you the simple cupcake toppers I made. It was a Tinkerbell-themed birthday party, so I decided to make cupcake toppers that have pictures of Tinkerbell and her newly found fairy friends. So sorry for the poor-quality photos; my mobile phone's camera isn't that good.
We also used BBQ sticks that Anton trimmed one by one to reduce the size.
That particular area where the toppers are placed is the topmost layer of the cupcake stand, by the way.
Once more, here's the photo of the cupcake tower and toppers, and we're proud that we were able to accomplish all of these despite the lack of skills and experience.
Since majority of what you see here are DIY stuff, we've actually been asked by a few people if we also baked the cupcakes, so in case you're wondering, too, the answer is no; we didn't bake the cupcakes. :)
Xoxo,
Have baby-smooth skin...for less!
Xoxo,
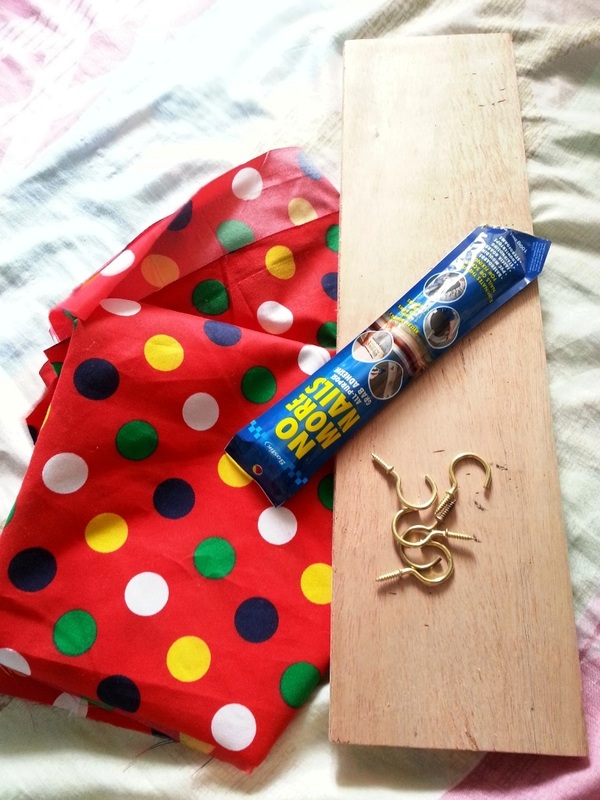
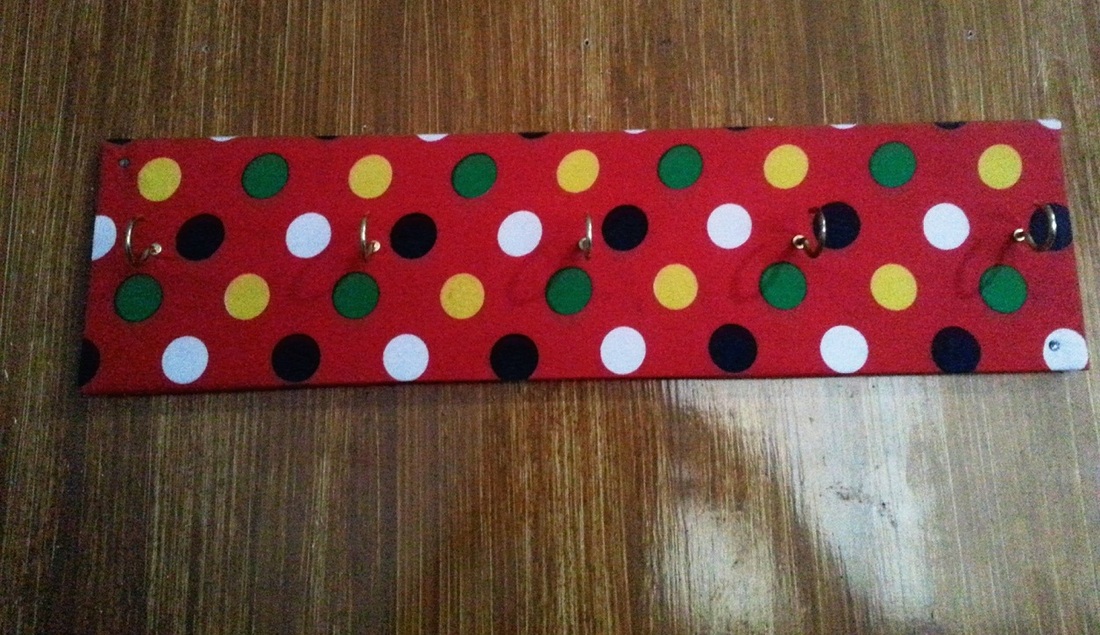
Our home doesn't have over-the-door hooks, where we can hang bags, shirt, jeans, etc., so I decided to create one myself. Here are the things I used:
A piece of wood
Fabric
Bostik No More Nails All-Purpose Grab Adhesive
5 hooks
Hand saw
Scissors
Pencil or pen
Ruler
Sand paper
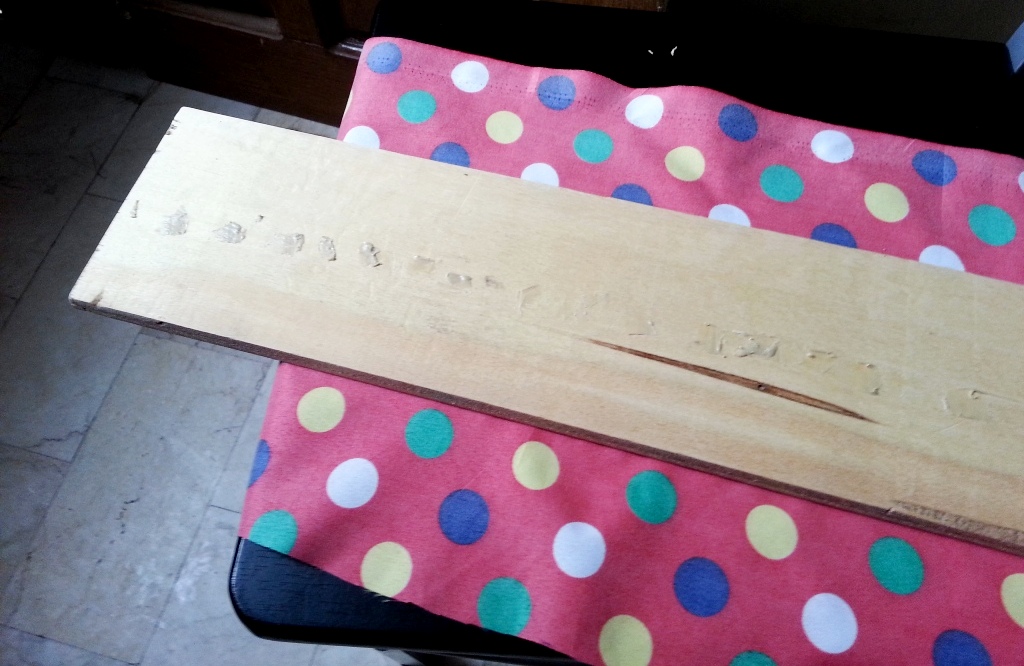
First, you need to measure how long your over-the-door hook should be. Originally, the wood I have measures 1 meter in length, so I was able to create 2 over-the-door hooks. Hubby used a hand saw to cut it in two pieces. Don't forget to sand the wood first to make sure it becomes smooth, especially if you're going to paint it. Note that sand papers have several kinds in terms of the texture, so what you'll be using depends on how rough the wood is.
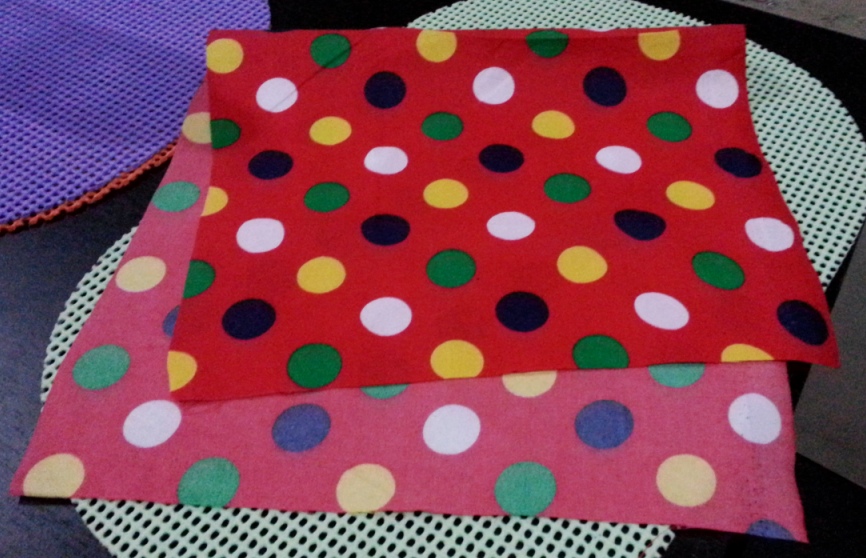
The next thing to do is to measure the wood, so you'll know the amount of fabric you are going to use. The wood I used isn't very big, but it isn't too small, either. Take a look at this:
Now is the part where the fabric is to be glued to the wood. If you're going to use Bostik No More Nails All-Purpose Grab Adhesive, you only need a small amount of it, because a little goes a long, long way, and it is very sticky! The only downside is that while it claims to have the ability to glue wood shelves onto the wall, unfortunately, you are still going to need a bracket or any other kind of support to ensure that they stay in place. I purchased this adhesive because I thought I can use it alone for my wood shelves, but it failed me.
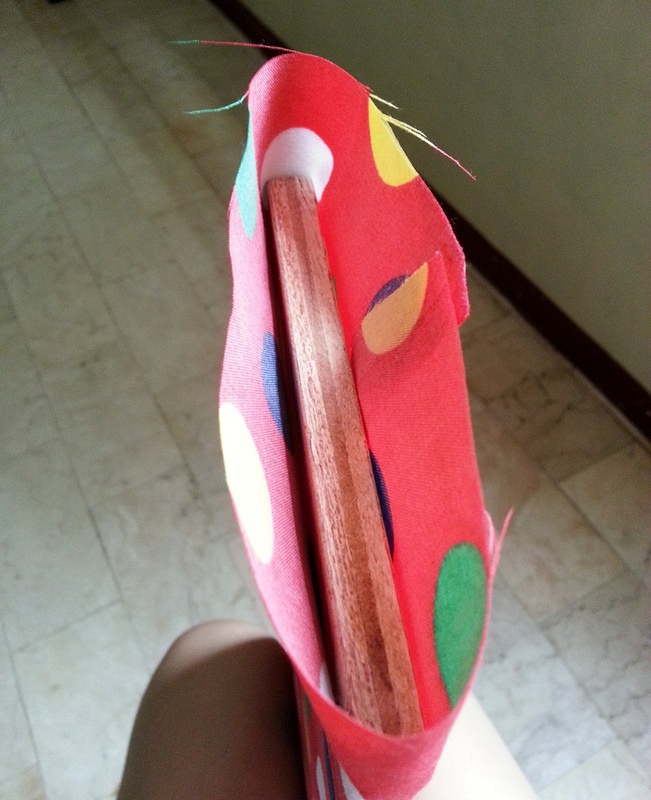
Anyway, here's how I glued the back of our over-the-door hook:
Make sure that the fabric is stretched tightly to avoid creases. I also ironed it to remove some.
In the image above, what I did here was that I folded the fabric like how I'd normally fold a gift wrapper each time I wrap a present. Again, be sure to stretch the fabric firmly to avoid creases. I used Bostik to secure it.
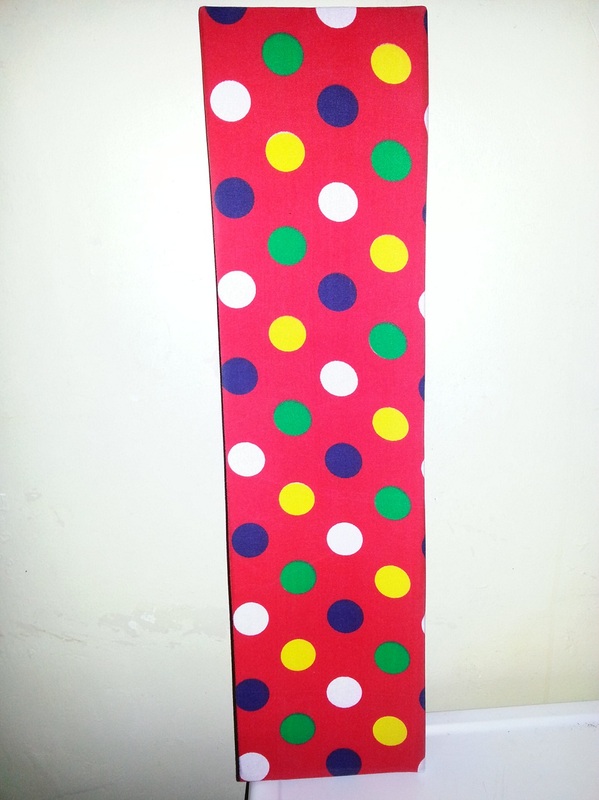
Voila! Here's the final outcome!
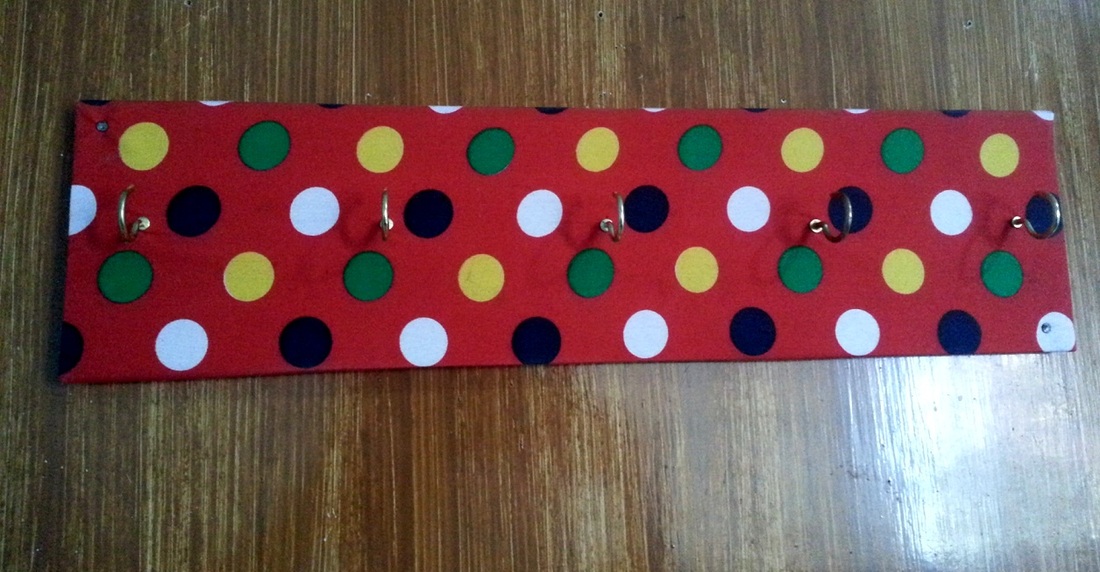
Not so final, though. I asked my dearest hubby to attach the hooks, to which he gladly did! :)
And here's the finished product!
With the size of wood I have (the one that was cut into two pieces), I can make two over-the-door hooks with a yard of fabric. And if you're going to ask how much did this item cost me, I'd say more or less P80 apiece. Very cheap, huh?
Until my next post!
Xoxo,
I'm a sucker for air fresheners, so I always make sure that there's one in the living room, one in the bathroom, and another one in the bedroom. Our home doesn't stink, but isn't it much nicer to live in a place where it always smells fresh? Besides, we have 2 pups that stay inside our home, so this is the more reason for me to become more conscious with the smell of our haven. :)
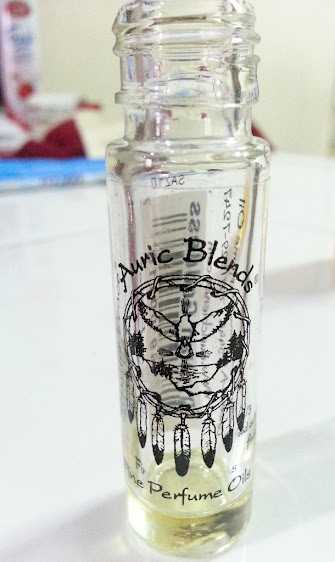
This DIY air freshener is soooo easy to do, and the good thing is that you will need only 3 items that are normally found in almost every home: rubbing alcohol, filtered/purified water and a high-quality essential oil. I said high quality, so the scent is sure to last long. I've tried a lot of brands of spray air fresheners, and some of them would release a very nice aroma that lasts only for a few seconds, so if you want the scent to linger a bit longer, I strongly recommend that you make use of a high-quality essential oil.
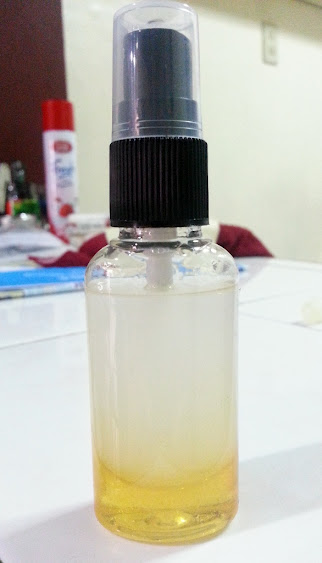
In my case, I used a fine perfume oil that has been stored in the cabinet for over a year, as I currently don't have an essential oil handy. This is what I used: The rubbing alcohol and water must have a 1:6 ratio, and about 20-40 drops of essential oil are needed. Mix them all together, and you now have an instant air freshener! I placed it in a small atomizer, and here is the finished product:
I just have to shake the bottle prior to using it, as the perfume oil settles underneath.
I noticed that the one I made gives off an aromatic scent that lasts long. As of writing this, I can still smell it, and it has been half an hour since I sprayed it in the living room area. This is why I highly suggest that you use a high-quality essential oil. The cost may be a bit higher, but it sure is going to be worth the purchase, I promise! :)
You can also use this on your linens to keep it sweet smelling. Your essential oil can be anything, depending on your preference. Personally, I like the mild-scented ones, such as lavender, peppermint and citrus (which I'll be purchasing next time to make another air freshener).
Xoxo,
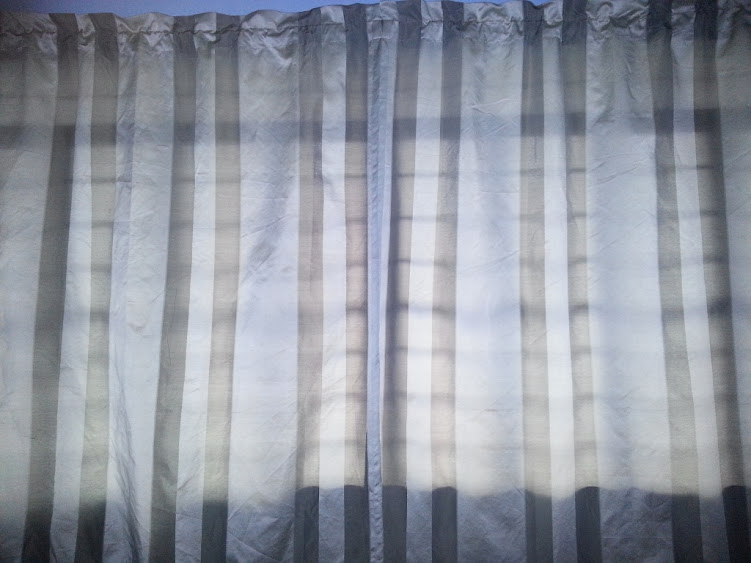
A week ago, I decided once and for all that my next purchase is going to be curtains for our bedroom. Lucky for me, as I got a hold of a cheap bedroom curtain that doesn't look cheap at all. For P500, I brought home a 2-panel curtain that somewhat helps darken our bedroom. I saw a blackout curtain, but I find it too expensive, and besides, curtains aren't really our first priority for now, so I settled for what I purchased. I was so excited to have Anton set it up the day I purchased it, so I can see if it can lessen the amount of light that comes in from the window. Here's a photo I took early in the morning (without flash):
And the second photo, obviously, was taken with a flash. :)
The photos don't do justice to my newly purchased curtain; it actually looks more beautiful when it's seen in person. While it does little to block the sunlight, at least my eyes no longer experience soreness from too much light, although I still keep my eye mask within reach. Yes, I still need an eye mask.
Another reason why I felt like I got a great deal is because of the material used to make this curtain. The fabric is quite thick I'm sure it's going to last for a long time even after numerous washes, plus I love the simplicity of the design (gray and white stripes).
So, am I pleased with my purchase? Absolutely! For P500, I got a 2-panel curtain that looks like I purchased it for a thousand bucks. :)
Xoxo,
|


 RSS Feed