Our office supplies are sometimes scattered almost everywhere; you can see a pair of scissors in our bedroom, a double-sided tape on the dining table, a few pens in a mason jar, or a glue on a fridge. It's such a mess, I know, so when we had an empty Zesto-O box available, I decided that it's time to give our office supplies a permanent "shelter". :D
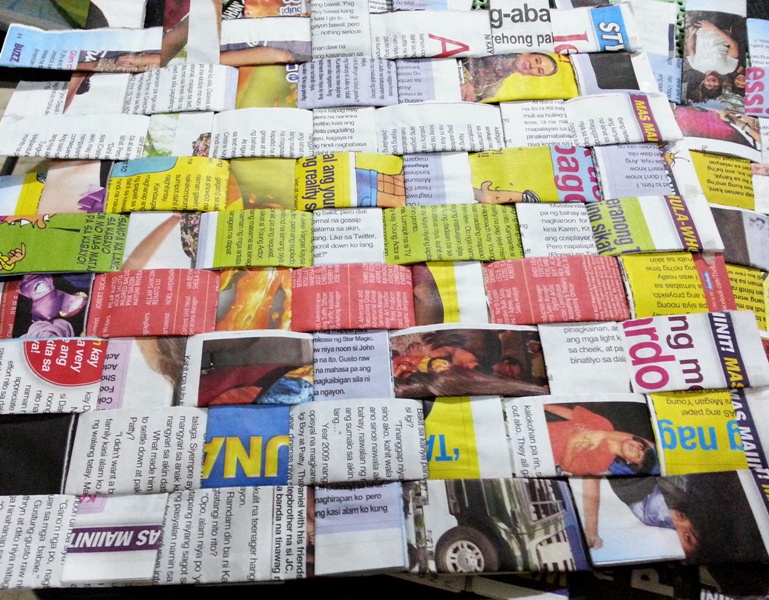
I used old magazines to cover the box, and what I did was make the covers look like they had been woven. Take a look at one of them:
By the way, I used glue to secure the pages while "weaving" each of them.
I don't have a photo of the Zesto-O box, but I assume that you're aware of how it looks like. :)
This is an easy DIY project, because you already have a ready-made box; all you need to do is to cover it with something nice to make it look presentable. Remember that this is something that other people will see inside your home, so make it look pretty decent looking, if not extremely decent looking.
Here's the recycled Zesto-O box, and it's always within my reach because here lies some of our important stuff. We have post-its, pens, small notebook, scotch tape, double-sided tape, a few Elmer's glue, label stickers, scissors, stapler, and more. Yeah, they all fit in this box.
You're free to put some decors if you wish. I attached that huge fabric flower that came with the long beaded necklace I've never used.
Boxes and old magazines can be recycled. With a little bit of creativity, you can come up with something that can be of use to declutter (and beautify) your happy home. Additionally, recycling is good for our Mother Nature, so try to be good and sweet by recycling and reusing what you can. :)
Xoxo,
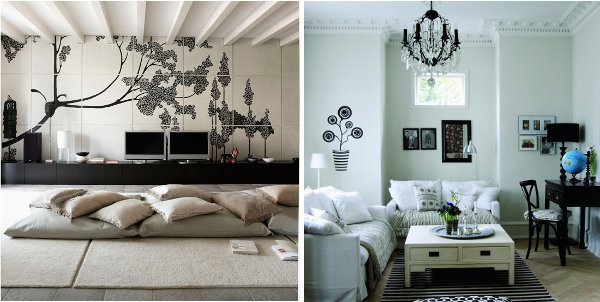
For those who would like to give the colors of their home a "face lift", here's an eye candy for you.
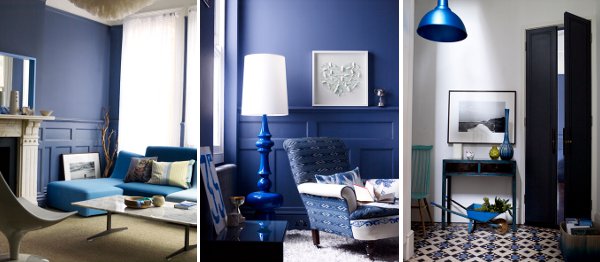
Monochromatic Color Scheme
A monochromatic scheme uses different values (tints, shades, tones) of only one colour, with the possible addition of white, black, and grey. Monochromatic schemes are easy to get right and can be very effective.
Monochromatic schemes with large white areas give a fresh, serene look – e.g. white walls and ceiling, bleached timber floor, and furniture in variations of the same colour.
Cool monochromatic schemes are soothing and peaceful, and make rooms appear larger than they really are. Use different values – from light to dark – to create interest and give depth to the interior.
Warm monochromatic schemes are energetic and vibrant, and have more visual weight than cool schemes. Add white to make the scheme lighter. Use neutrals (grey, off-whites) with light pastels to create calm, airy interiors. Use black, white and grey to create elegant, calming interiors. Any color that you introduce in a black and white interior will draw the eye and add interest.
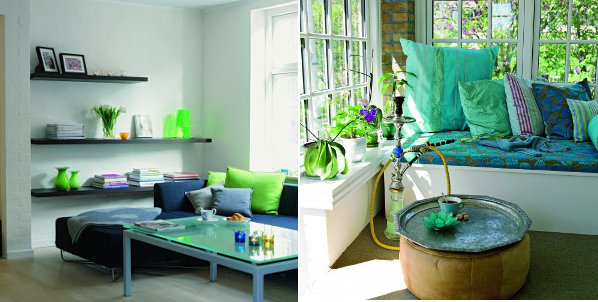
Analogous Color Schemes
Analogous colour schemes use 2-3 colours close to one another on the color wheel. Adjacent colours are naturally harmonious, and are usually more interesting than monochromatic schemes.
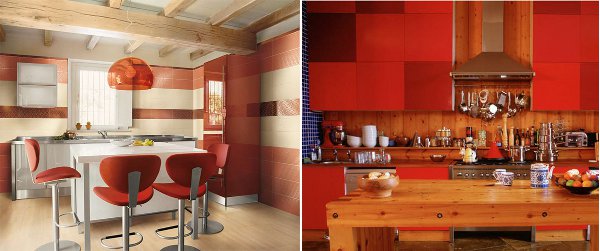
While cool colors are usually easy to live with, warm colors – especially red and orange – can feel overwhelming, both for their visual weight and for the energy they convey. If you like warm colors but want to retain tranquility, use them only as accents against a neutral background.
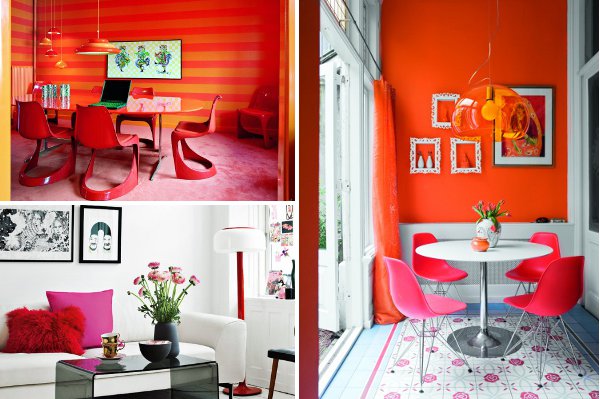
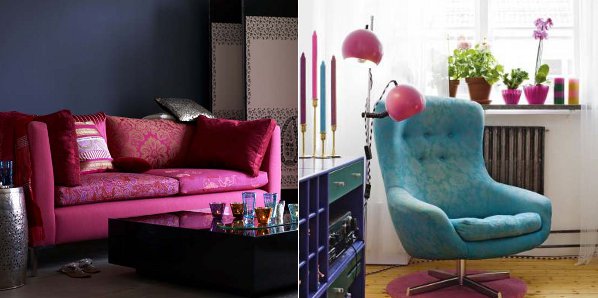
Complementary Color Scheme
Complementary colors are colors located opposite each other on the color wheel; when used together, they enhance and complete each other. In complementary color schemes, you usually choose one colour as your main color, and its opposite as an accent. For an elegant look, use a saturated color against a muted one; if you prefer bold schemes, choose intense colors against a neutral background.
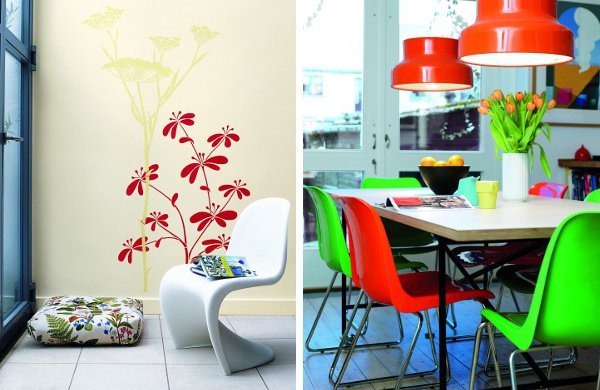
Triadic Color Scheme
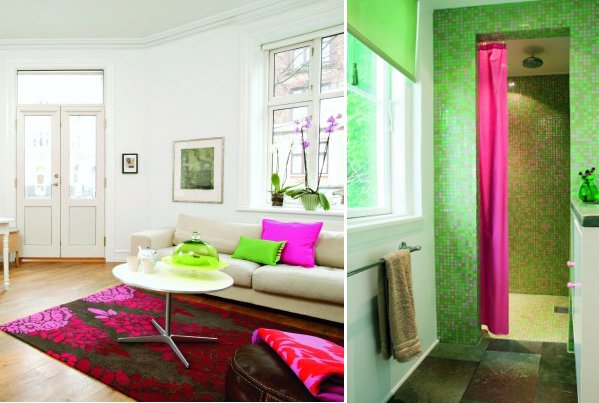
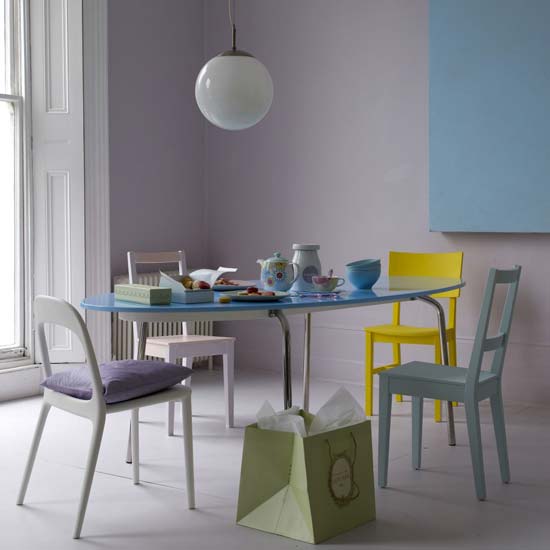
The triadic color scheme uses three colors equally spaced around the color wheel. Use this scheme if you want your room to offer both a strong visual contrast and a balanced, harmonious look. In the first picture, the triad consists of blue, magenta (red-purple) and yellow (gold in cushions and fabric). In the second picture, the yellowish pine flooring completes the triad blue – magenta – yellow.
Split-Complementary Color Scheme
A variation of the complementary scheme, the split-complementary scheme uses one color and the two colors adjacent to its complementary. Use it if you want to retain high contrast but prefer a more serene look.
Color schemes are meant to offer a guide, but don’t feel like you have to follow them too strictly. Sometimes you can choose variations of colors that are not exactly part of a color scheme, but still work well together.
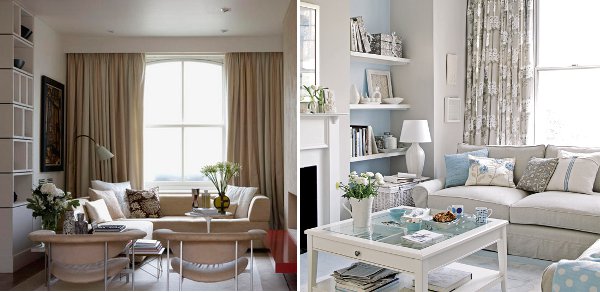
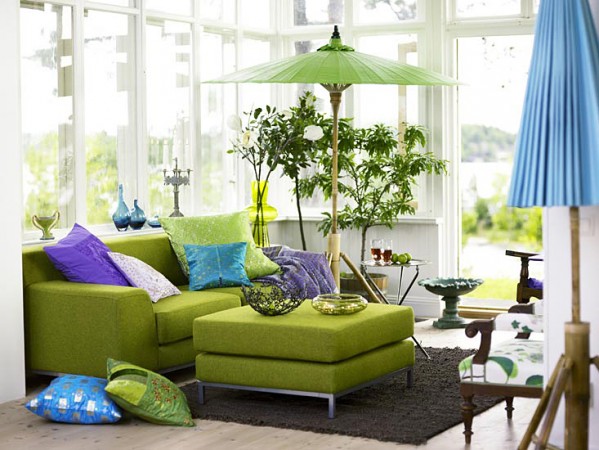
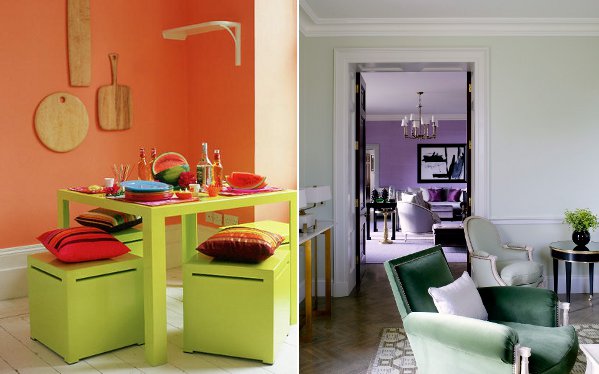
In this sitting area, green, blue and purple create a vibrant yet balanced combination – although not adjacent on the color wheel, the color used are still close enough to be harmonious.
In this dining area, the yellow chair adds vibrancy to the delicate cool pastel colors; the scheme works well because all colors have light values. When in doubt, take your inspiration from nature. A couple of examples? Lime green and orange are part of the same citrus family, and work really well together; purple and green are at home in a vineyard, and look striking in any interior.
Photo and article source: Positivelybeauty.com
While Anton and I both work for a living, we still believe that wise spending must not be overlooked. I know that there are tons of people out there who think that a frugal way of living is associated with scarcity and cheapness; however, Anton and I believe that stretching our earnings can be an enjoyable experience. For some, living in a penny-pinching lifestyle is embarrassing, but I really don’t see any reason why these people are humiliated and won’t admit to anyone that they are keeping within their means.
For one, being frugal doesn’t equate to scarcity; as a matter of fact, we can still buy our “wants” apart from our “needs”. Our purchases are carefully taken into account to make sure that we get our money’s worth, and because we’re practicing thriftiness, we get to appreciate each and every item that we acquire.
It isn’t cheap when you’re practical, and surprisingly, you could be spending more money at first, but after a while, this is when you realize that you’re indeed saving a huge amount of cash. I always have this judgment that “you get what you pay for”, but being able to plan for our very own wedding for a year has made me realize that not all reasonably priced stuff provide poor-quality outcome. Practically all our wedding vendors had exceeded our expectations, having rates that do not come close to the amount that many popular wedding suppliers would normally charge their clients. I’m not talking about wedding preps; my point here is clearly stated: I was wrong to say that when it’s cheap, it isn’t good.
We eat more than three times each day, and we get to delight ourselves with delicious meals at home and enjoy what’s being served to us in restos from time to time. We seldom eat at posh restaurants, where people pay thousands of cash for a small quantity of food, but I am proud to say that we are never deprived of anything that we want to eat.
Being frugal allows me to show my resourcefulness and ingenuity, not to mention the fulfillment and the adventure that it gives me. I am able to produce something nice and useful without the need to spend a lot of money; hence, what’s left in our pockets are often spent on more important things, such as utilities, groceries, and occasional spending on what we call our “simple luxuries”.
It’s true that doing things on your own is time consuming. From setting up the shelves to getting the broken items fixed all by yourself, lots of time are going to be spent, but for me and Anton, nothing is more rewarding than being able to do things together. For us, it is definitely much better than working for extended hours just so we can dine at expensive restos and buy even the most unnecessary items that will only sit somewhere around the house until we can think of something where these items are going to be used. I used to be this type of person, and I remember forcing my mom to buy whatever I want, be it something I’ll be using or not. I enjoyed my childhood years so much, because I was given everything that every kid longs to have. I used to be a prima donna, but hey, I’m not getting any younger, and now is not the right time to act like a diva of all sorts. Living on our own as a newly married couple has made me realize that being practical is of the utmost importance.
We don’t have “plastics”, as what people call it, but we live within our means, which is the most important thing. I don’t know about you, but here’s my opinion: being frugal, either because you need to, or you just want to, is truly satisfying; it’s how you look at it that makes the idea positive or negative.
Xoxo,
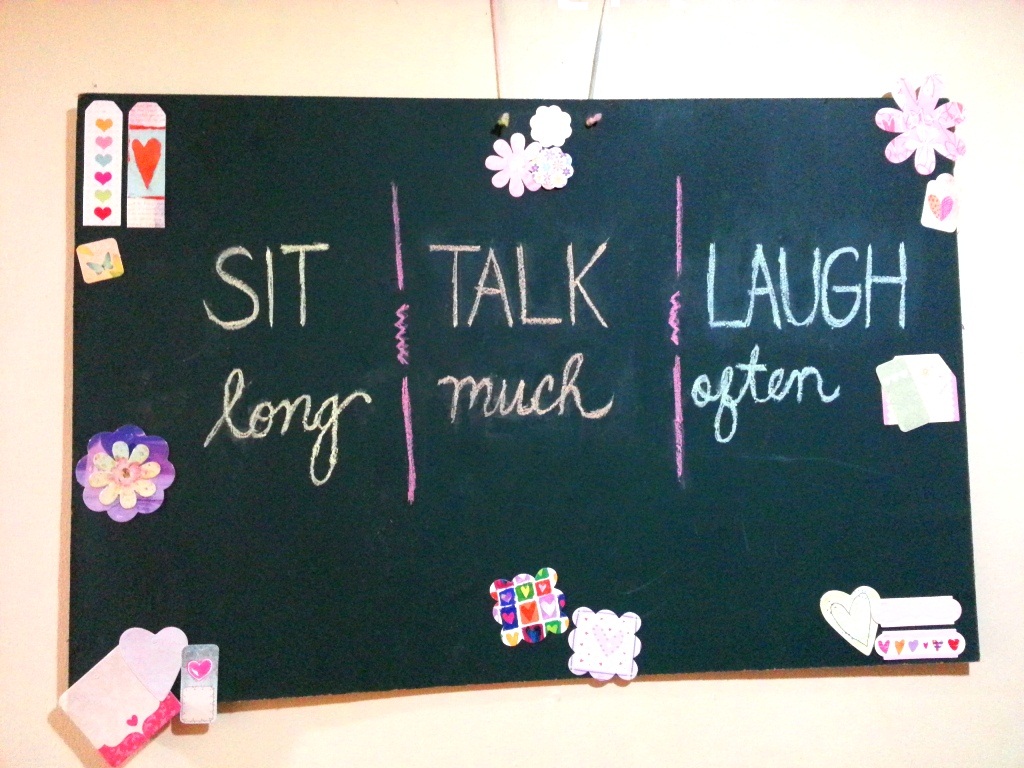
It's now time for me to put something on the wall, particularly in the dining area, so I decided to purchase a chalkboard, colored chalks and scrapbook embellishments to decorate the board. My main goal for our dining area is to have a splash of colors (which made me purchase pastel-colored placemats), so here's what I did with the chalkboard:
Please bear with my handwriting; I know that it kind'a ruined the beauty of the chalkboard, but Anton's handwriting is worse than mine, so I had no choice, but to write on it myself. Nevertheless, I find the quote really suitable for any dining area. These things actually are what I would like us to do whenever we sit down to eat. Each week, though, I'd write different quotes on this board to keep us inspired. :)
I'm almost done with the other DIY project I'm creating, so I'll keep you guys posted.
Xoxo,
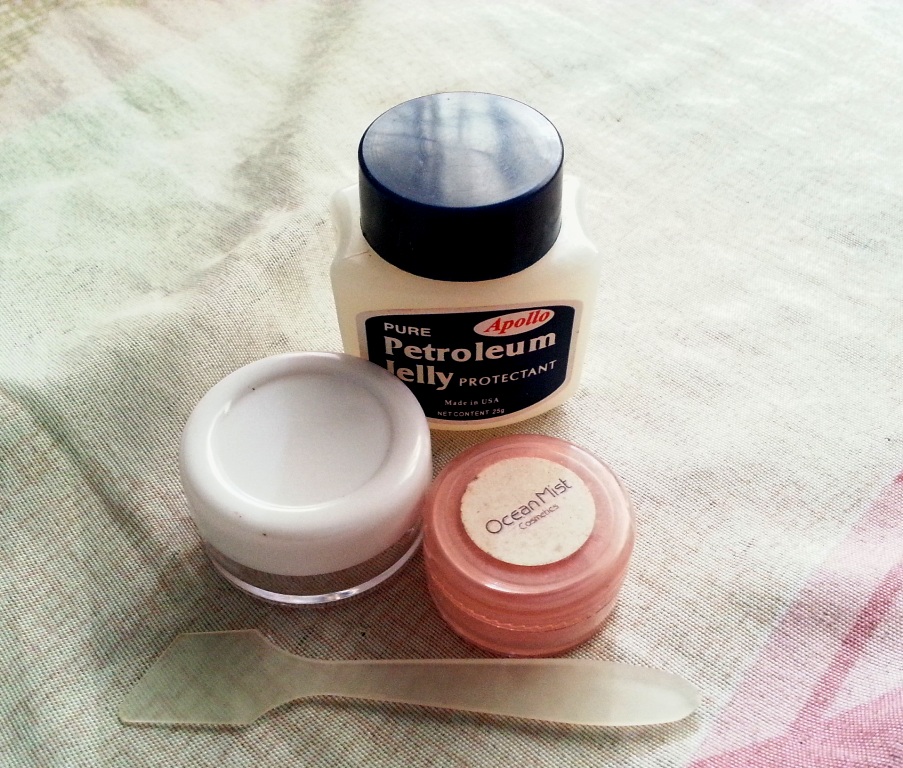
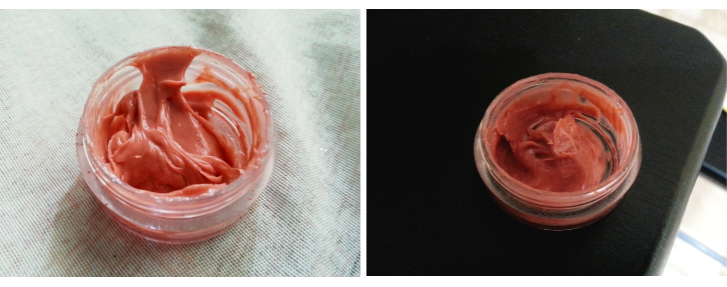
This is very basic, meaning anyone can do this in just a couple of minutes. All you need is a petroleum jelly, which, by the way, helps prevent chapping and drying of lips, a blush or eyeshadow in powder form, mini spatulas for mixing, and a small container for the mixture itself.
You see, I have tons of mineral makeup (used and unused), so the minute I decided that I want to try this out, I was able to prepare everything I need immediately. I also have petroleum jelly available, as well as a couple of small containers and mini spatulas.
Simply combine petroleum jelly and your blush/eyeshadow makeup, and be sure to mix them well.
Here it is! Also, don't forget to clean the edges of the container.
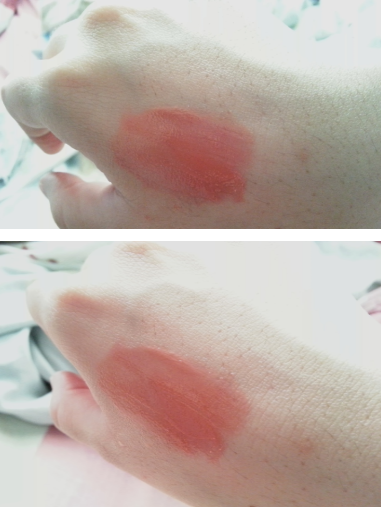
It appears to be red orange in color, but take a look at the actual shade when applied. I just love how subtle the color is!
And best of all, I love how it's going to make my lips uber soft 24/7! :D
It makes a wonderful gift for your dear mom, sisters and girl friends. You can put a cute, personalized label on the lid, or you can also tie a nice ribbon around the container.
This project is so addicting! Aside from the fact that it can be done in less than 10 minutes, you get to experiment on a lot of colors, plus your lips are sure to look super luscious throughout the day (and night)!
Xoxo,
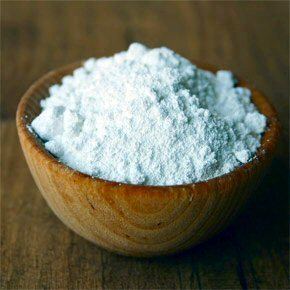
I read this article 2 days ago, and I just thought it would be better if a lot of people are aware of how powerful (and uber affordable) baking soda is.
Baking soda is a chemical compound that appears as a fine powder. It releases bubbles of carbon dioxide when it interacts with an acid and a liquid. It’s most commonly used in baking, where it acts as a leavening agent. The following are 75 other uses for baking soda aside from making muffins soft and fluffy.
Health Uses
1. Use it as an antacid.
2. Use it as underarm deodorant by applying it with a powder puff.
3. Mix half a teaspoon with peroxide paste and use it as toothpaste.
4. Use it as a face and body scrub.
5. Add a cup to bathwater to soften your skin.
6. Relieve skin itch from insect bites and pain from sunburn.
7. Remove strong odors from your hands by rubbing them with baking soda and water.
8. Put two tablespoons in your baby’s bathwater to help relieve diaper rash.
9. Apply it on rashes, insect bites, and poison ivy irritations.
10. Take a baking soda bath to relieve skin irritations.
11. Heartburn? Take a teaspoon of baking soda mixed with one-half glass of water.
12. Freshen your mouth by gargling half a teaspoon of baking soda mixed water.
13. Relieve canker sore pain by using it as mouthwash.
14. Use it to relieve bee stings.
15. Use it to relieve windburns.
16. Apply it on jellyfish sting to draw out the venom.
17. Unblock stuffy nose by adding a teaspoon of baking soda to your vaporizer.
In the Home
18. Keep cut flowers fresh longer by adding a teaspoon to the water in the vase.
19. Put out small fires on rugs, upholstery, clothing, and wood.
20. Put an open container of baking soda in the fridge to absorb the odors.
21. Sprinkle it on your ashtrays to reduce bad odor and prevent smoldering.
22. Sprinkle it on your slippers, boots, shoes, and socks to eliminate foul odor.
23. Turn baking soda into modeling clay by combining it with one and 1/4 cups of water and one cup of cornstarch.
24. After feeding your baby, wipe his shirt with a moist cloth sprinkled with baking soda to remove the odor.
25. Wipe your windshield with it to repel rain.
26. Improve the smell of dishrags by soaking them in baking soda and water.
27. Suck it in with your vacuum cleaner to remove the odor.
28. Freshen the air by mixing baking soda with your favorite perfumed bath salts. Put the mixture in small sachet bags.
29. Restore stiff brushes by boiling them in a solution of 1/2 gallon of water, 1/4 cup of vinegar, and a cup of baking soda.
30. Put it under sinks and along basement windows to repel cockroaches and ants.
31. Scatter baking soda around flowerbeds to prevent rabbits from eating your veggies.
32. Sweeten your tomatoes by sprinkling baking soda on the soil around your tomato plants.
33. Sprinkle it onto your cat’s litter box to absorb the bad odor.
34. Sprinkle it on your pet’s comb or brush to deodorize their fur and skin.
In Cooking
35. Use it as a substitute for baking powder by mixing with it with cream of tartar or vinegar.
36. Wash fruits and vegetables with it.
37. When boiling a chicken, add a teaspoon of baking soda to the water. Feathers will come off easier, and the flesh will be clean and white.
38. Soak dried beans to a baking soda solution to make them more digestible.
39. Remove the distinctive taste of wild game by soaking it in a baking soda solution.
40. Make a sports drink by mixing it with boiled water, salt, and Kool-Aid.
41. Remove the fishy smell from your fillets by soaking the raw fish in a baking soda solution for an hour inside the fridge.
42. Make fluffier omelets by adding half a teaspoon of baking soda for every three eggs used.
43. Reduce the acid content of your tomato-based recipes by sprinkling them with a pinch of baking soda.
Cleaning Purposes
44. Add a cup to the toilet, leave it for an hour, and then flush. It will clean the toilet and absorb the odor.
45. Use it to scrub sinks, showers, plastic and porcelain tubs
46. Spray it on walls, mirrors, and countertops.
47. Add a spoonful to your dishwasher to make scrubbing dishes easier.
48. Remove grease from pots and pans.
49. Dry clean carpets and upholstered furniture by sprinkling baking soda over the fabric and gently brushing it. Leave it for an hour or overnight, then vacuum.
50. Boost your laundry detergent’s cleaning power by sprinkling a handful on dirty clothes.
51. Combine it with water to make a paste for polishing stainless steel and chrome.
52. Remove scratches and crayon marks from vinyl floors and walls.
53. Clean your shoes with it.
54. Clean garbage cans with it.
55. Use it to wash diapers.
56. Clean the fridge with it.
57. Soak brushes and combs in a baking soda solution.
58. Mix it with water to wash food and drink containers.
59. Put three tablespoons of baking soda to a quart of warm water, then use the mixture to wash marble-topped furniture.
60. Absorb it with a damp sponge, then clean Formica countertops with the sponge.
61. Use it to get rid of stale odors from cooling containers and thermos bottles.
62. Run your coffee maker with a baking soda solution, then rinse.
63. Combine with hot water to clean baby bottles.
64. Sprinkle it on barbecue grills, then rinse it off.
65. Scatter it on your greasy garage floor, scrub the floor, and rinse.
66. Remove burned-on food from a pan by soaking it in a baking soda solution for 10 minutes before washing.
67. Clean your ashtrays with a baking soda solution.
68. Keep your drains clean by putting four tablespoons of baking soda in them each week. Flush it down with hot water.
69. Clean your shower curtains by soaking them in baking soda and water.
70. Put it on a small brush to rub canvas handbags clean.
71. Use it to remove melted plastic bread wrapper from a toaster. Sprinkle baking soda on a damp rug, then use the rug to clean the toaster.
72. Use it to clean your retainers and dentures.
73. Make a thick paste of baking soda and water, and used it to scrub enameled cast iron and stainless steel.
74. Mix four tablespoons of baking soda with a quart of warm water, and use it to clean the inside part of an oven.
75. Use it to unclog gas stoves.
The most amazing thing about baking soda is that it’s very cheap. You can do all these things for a very small cost. Baking soda is truly a miracle product, whether it’s used for baking or not.
Photo and article source: Lifehackery.com
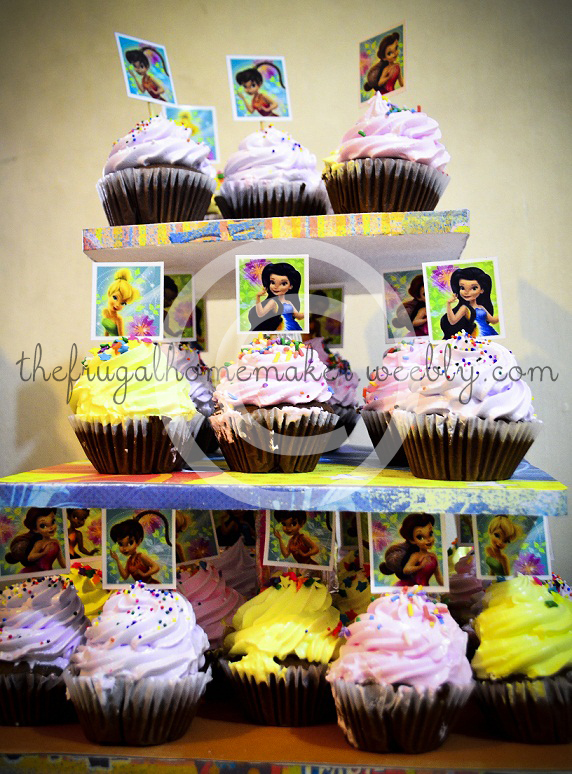
I was busy (and thrilled) for a few days last week making a cupcake tower/stand, cupcake topper and paper garland for Makiko's, our dearest niece, 1st birthday party. I must say this was quite a challenge for me because I have never made any party decoration before...ever! I wanted to make these DIYs almost perfect, if not perfect, as these are some of the things that a lot of people will be seeing at the party.
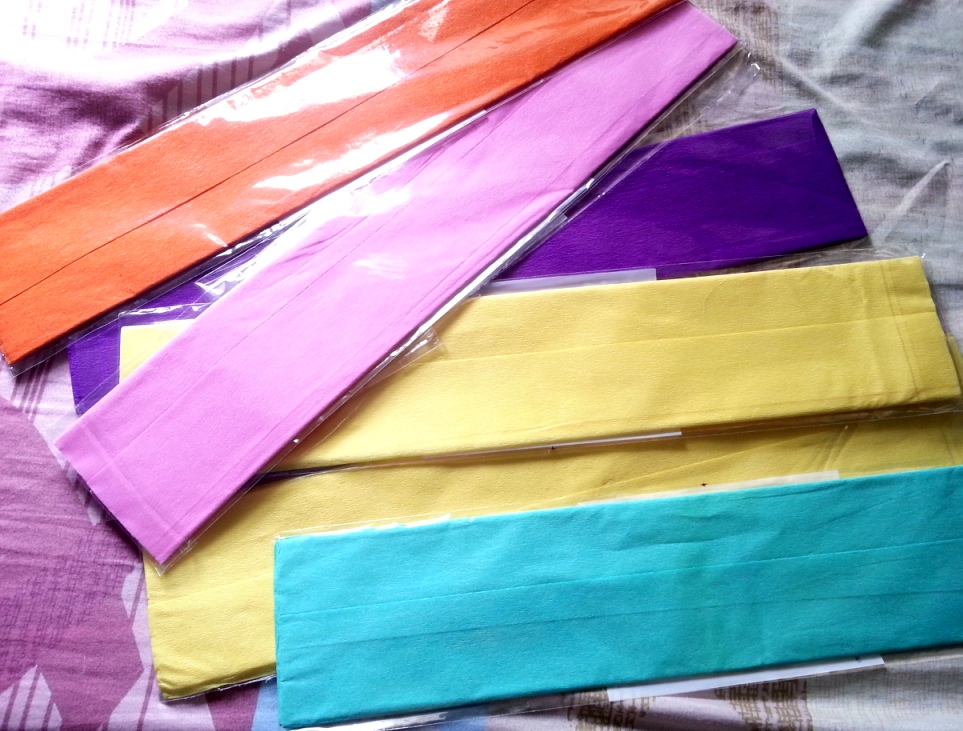
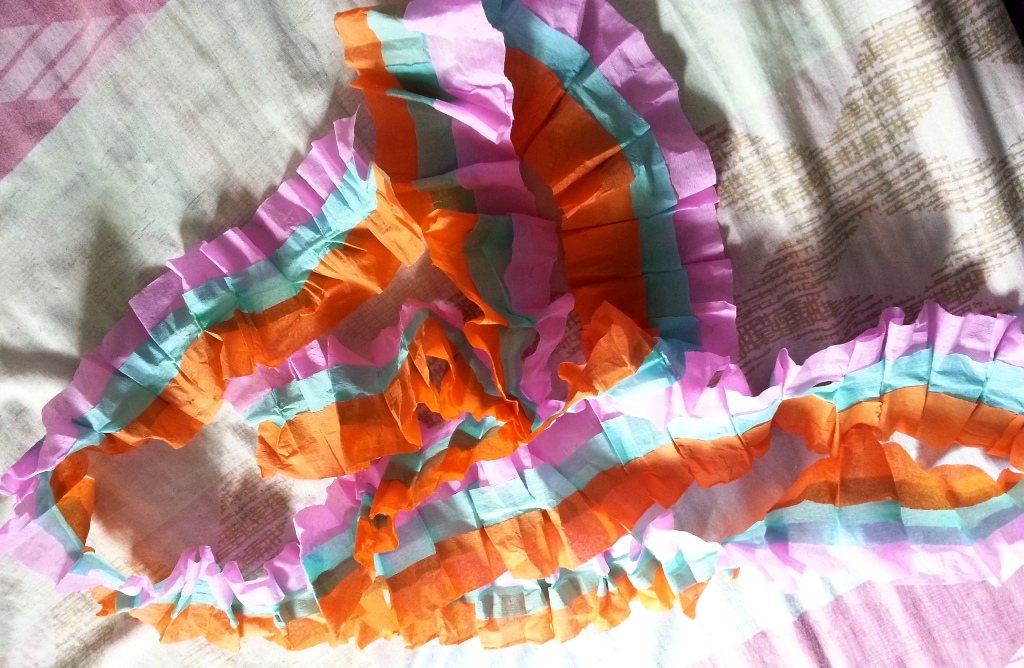
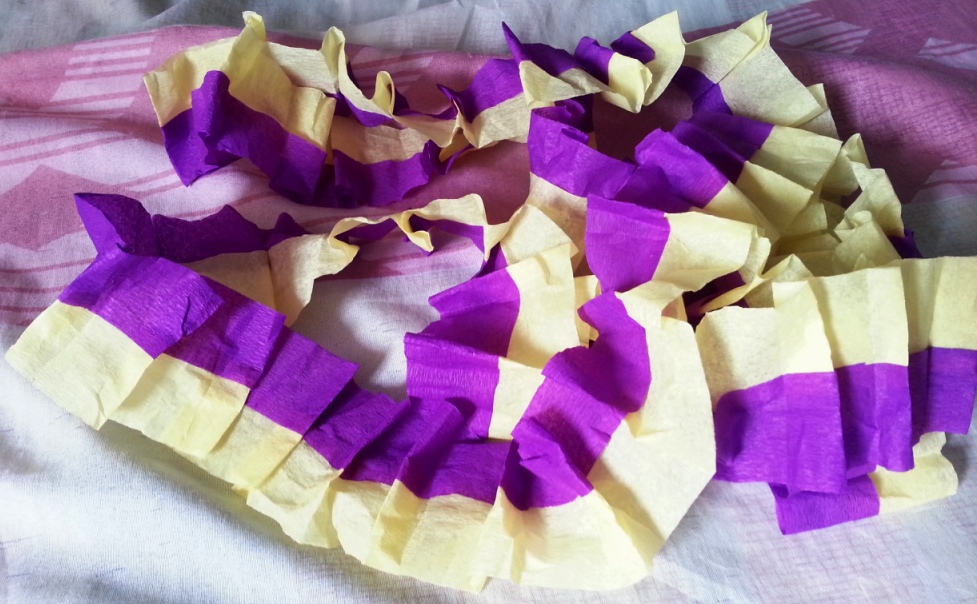
Let's start with the paper garland. Here, I used crepe papers in various colors, scissors and double-sided tape. I wanted to make the garlands colorful, so I chose these colors: I didn't intend to create the usual paper garland that is straightly hung on the wall; I want it ruffled! Most of the people who made ruffled garlands (be they fabric or paper) utilized a sewing machine to create that "ruffled/pleated effect", so I thought this was going to be a one, big problem for me. After a few minutes of brainstorming on my own, I've decided to use a double-sided tape to create pleats. Sorry I wasn't able to ask Anton to take a picture of me forming the ruffles, but to give you an idea, what I did was I folded the crepe papers continuously until I came up with numerous small pleats/ruffles, and here's the outcome:
I am so hoping that you got the gist, people. :)
This is very time consuming compared to when a sewing machine is used, so if you want to create something like this, I strongly suggest that you give yourself ample time to get a couple of them done. I tried to use glue to keep those ruffles in place, but it wasn't sticky enough, so this is another reason for me to love double-sided tape even more! :D
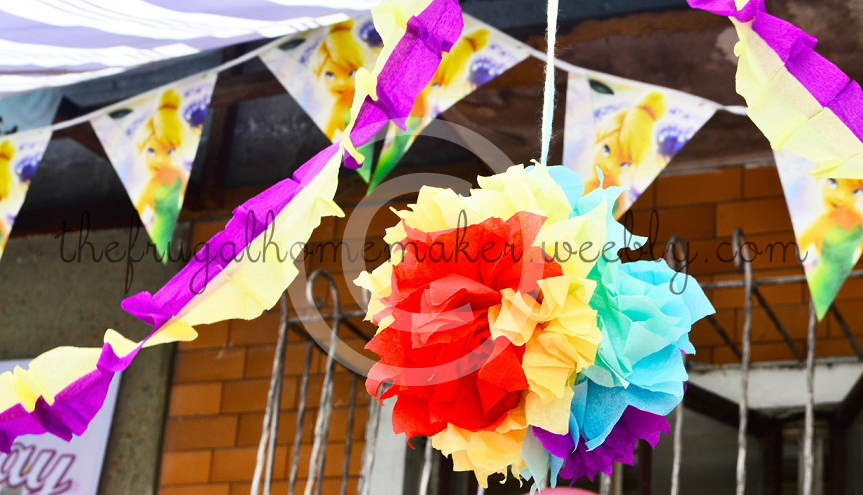
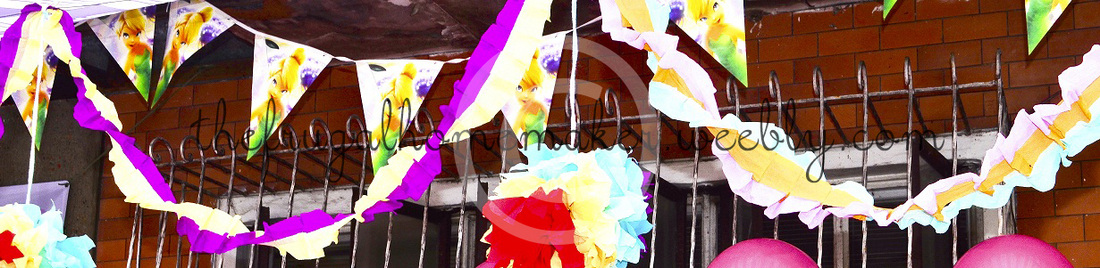
Here's how the garlands looked like when they were hung:
That beautiful pompom, by the way, wasn't created by yours truly; it was made by Anton's eldest sister who happens to be very creative as well. :)
Moving on to the next one, which is the cupcake tower. Anton and I gave 30 pieces of cupcakes for the little princess as a birthday present, and since we both find cupcake tower kits and ready-made stands a bit expensive, we decided to create one ourselves. I definitely won't take the full credit here, as hubby dearest was the one who did most of the work to get this thing done.
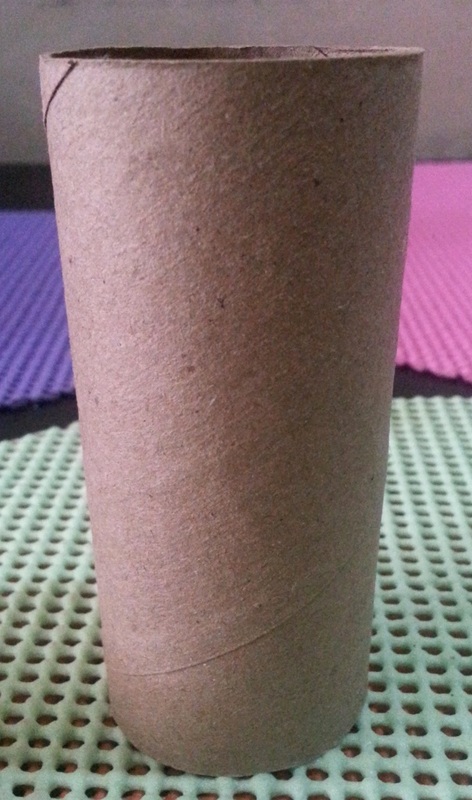
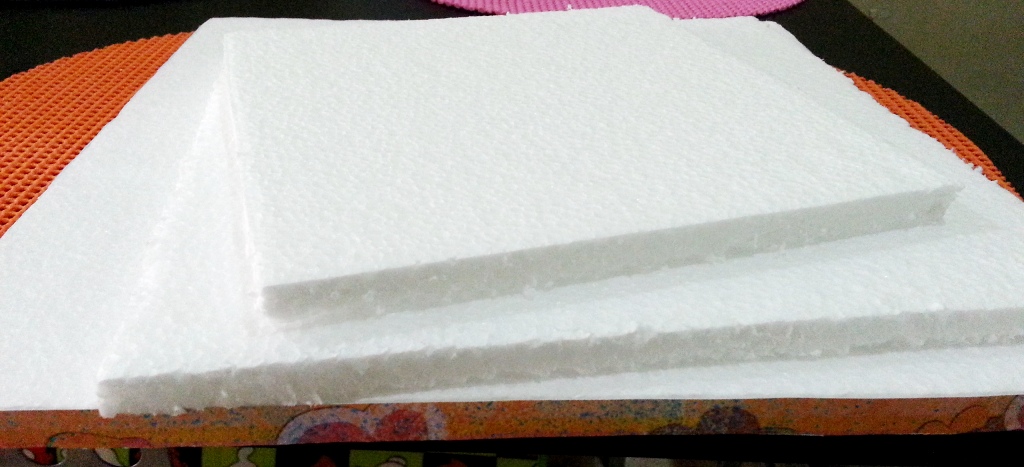
We used square-shaped styrofoams and a few scrapbook papers to cover it. As for the stand that will support the tower itself, we used toilet paper tubes and aluminum foil to cover them, and of course, this will never be a cupcake tower without the scissors and the ever-useful double-sided tape.
Anton cut the styrofoams in 3 different sizes before covering them entirely with scrapbook papers. As you can see, the edges of the biggest styrofoam already has a cover, and obviously, I did the same thing with the other 2. I then covered the top portion with scrapbook papers before Anton slightly, yet firmly embedded the foil-covered toilet paper tubes underneath the 1st and 2nd layer of the styrofoam.
Have a look at the final outcome:
Please note that since we used toilet paper tubes as support, this wasn't as sturdy as we expected it to be, so if you want something that's hard wearing, you can use something else except toilet paper tubes. We had no issues with the styrofoam itself; the only problem we had was when somebody meddled with the tubes, which made the cupcake tower a bit more challenging. Nevertheless, it still looks cute and presentable, and we were able to put all the cupcakes in each layer without collapsing.
One more tip: measure how tall your cupcakes are going to be before you make a cupcake stand. In our case, we didn't have any clue that the icings on top are about an inch tall, plus we still have cupcake toppers that will be placed above the icing. We're still lucky, though, that the tower we made was adjustable. As first-time makers of cupcake stand, our creation, I must say, is good, and it did serve its purpose well!
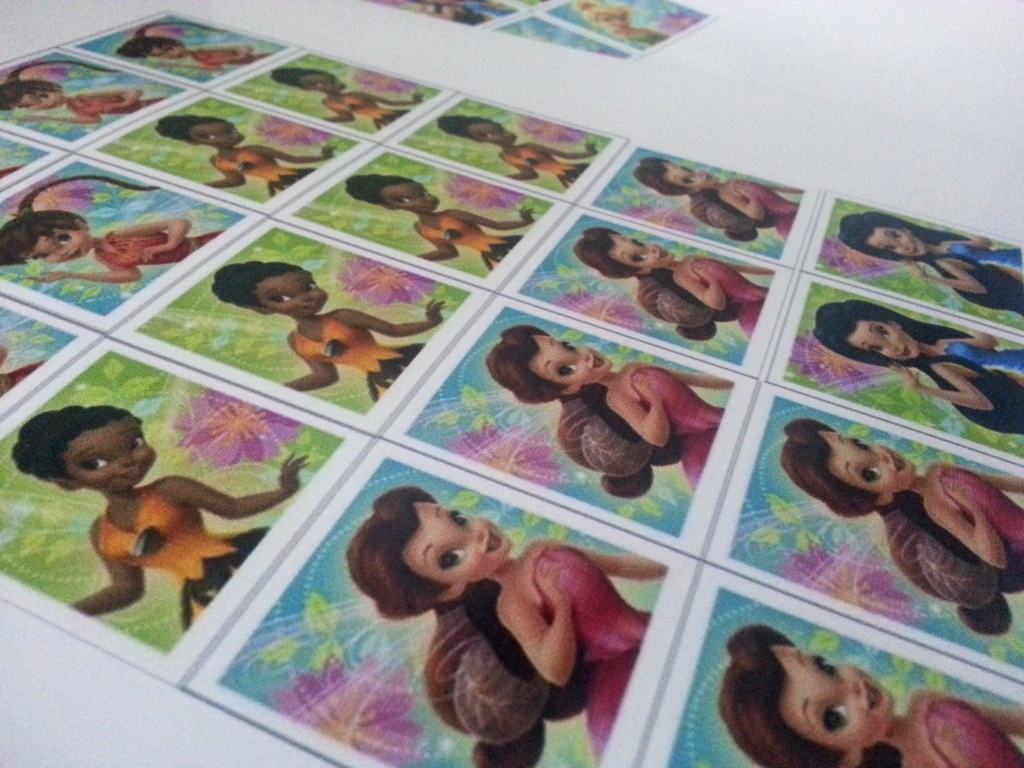
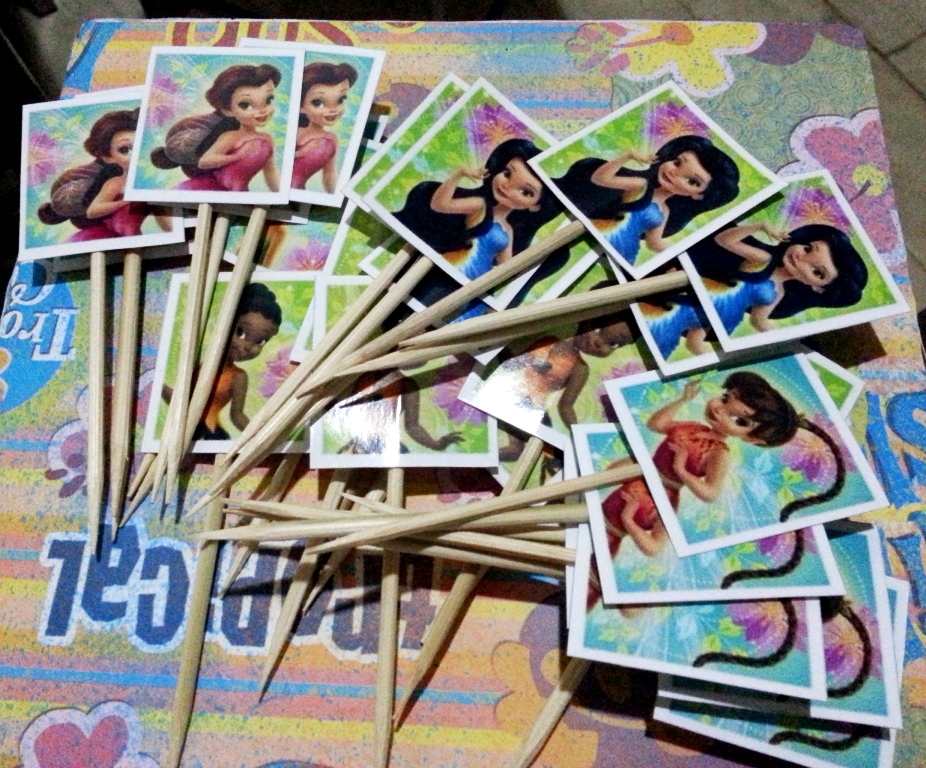
Finally, I want to show you the simple cupcake toppers I made. It was a Tinkerbell-themed birthday party, so I decided to make cupcake toppers that have pictures of Tinkerbell and her newly found fairy friends. So sorry for the poor-quality photos; my mobile phone's camera isn't that good.
We also used BBQ sticks that Anton trimmed one by one to reduce the size.
That particular area where the toppers are placed is the topmost layer of the cupcake stand, by the way.
Once more, here's the photo of the cupcake tower and toppers, and we're proud that we were able to accomplish all of these despite the lack of skills and experience.
Since majority of what you see here are DIY stuff, we've actually been asked by a few people if we also baked the cupcakes, so in case you're wondering, too, the answer is no; we didn't bake the cupcakes. :)
Xoxo,
Have baby-smooth skin...for less!
Xoxo,
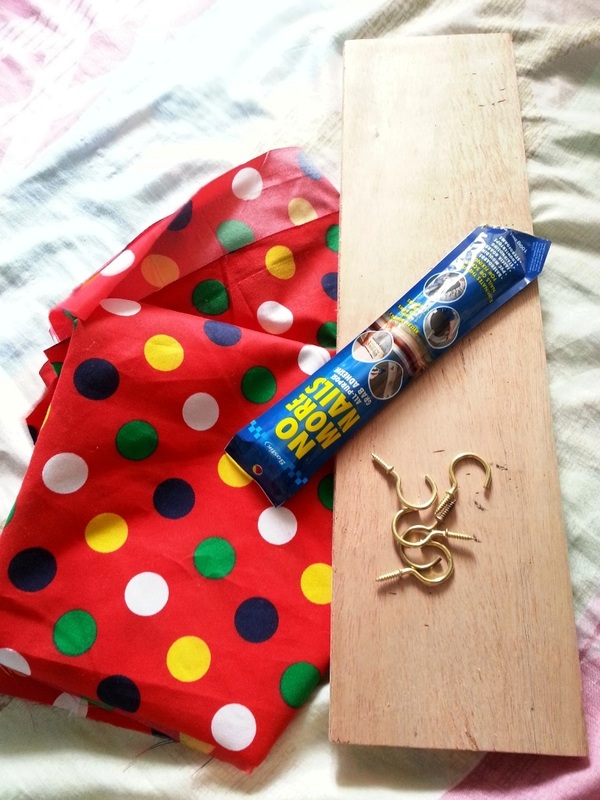
Our home doesn't have over-the-door hooks, where we can hang bags, shirt, jeans, etc., so I decided to create one myself. Here are the things I used:
A piece of wood
Fabric
Bostik No More Nails All-Purpose Grab Adhesive
5 hooks
Hand saw
Scissors
Pencil or pen
Ruler
Sand paper
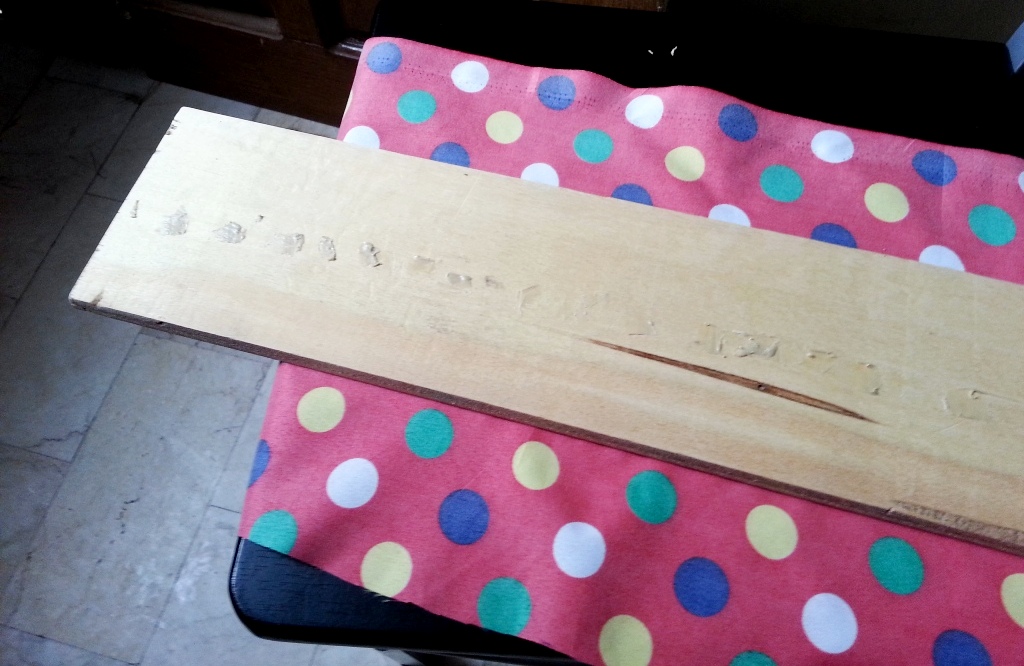
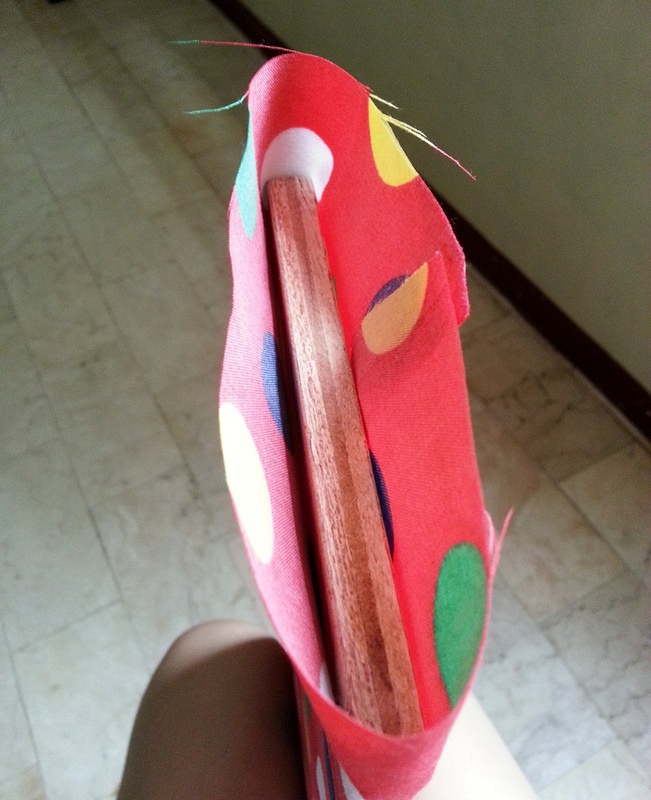
First, you need to measure how long your over-the-door hook should be. Originally, the wood I have measures 1 meter in length, so I was able to create 2 over-the-door hooks. Hubby used a hand saw to cut it in two pieces. Don't forget to sand the wood first to make sure it becomes smooth, especially if you're going to paint it. Note that sand papers have several kinds in terms of the texture, so what you'll be using depends on how rough the wood is.
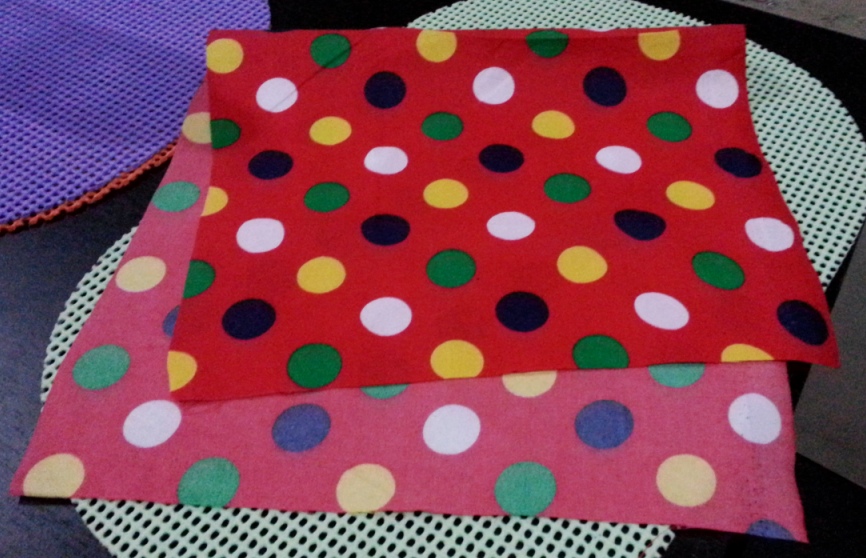
The next thing to do is to measure the wood, so you'll know the amount of fabric you are going to use. The wood I used isn't very big, but it isn't too small, either. Take a look at this:
Now is the part where the fabric is to be glued to the wood. If you're going to use Bostik No More Nails All-Purpose Grab Adhesive, you only need a small amount of it, because a little goes a long, long way, and it is very sticky! The only downside is that while it claims to have the ability to glue wood shelves onto the wall, unfortunately, you are still going to need a bracket or any other kind of support to ensure that they stay in place. I purchased this adhesive because I thought I can use it alone for my wood shelves, but it failed me.
Anyway, here's how I glued the back of our over-the-door hook:
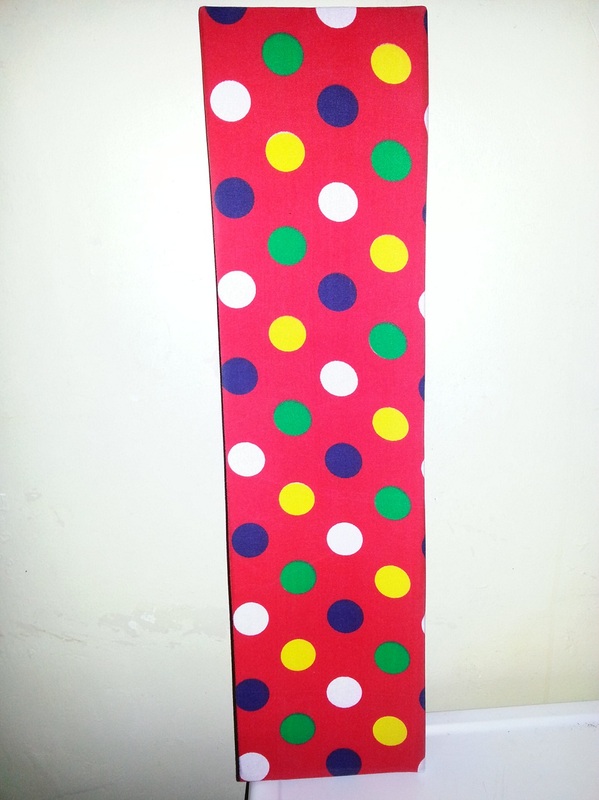
Make sure that the fabric is stretched tightly to avoid creases. I also ironed it to remove some.
In the image above, what I did here was that I folded the fabric like how I'd normally fold a gift wrapper each time I wrap a present. Again, be sure to stretch the fabric firmly to avoid creases. I used Bostik to secure it.
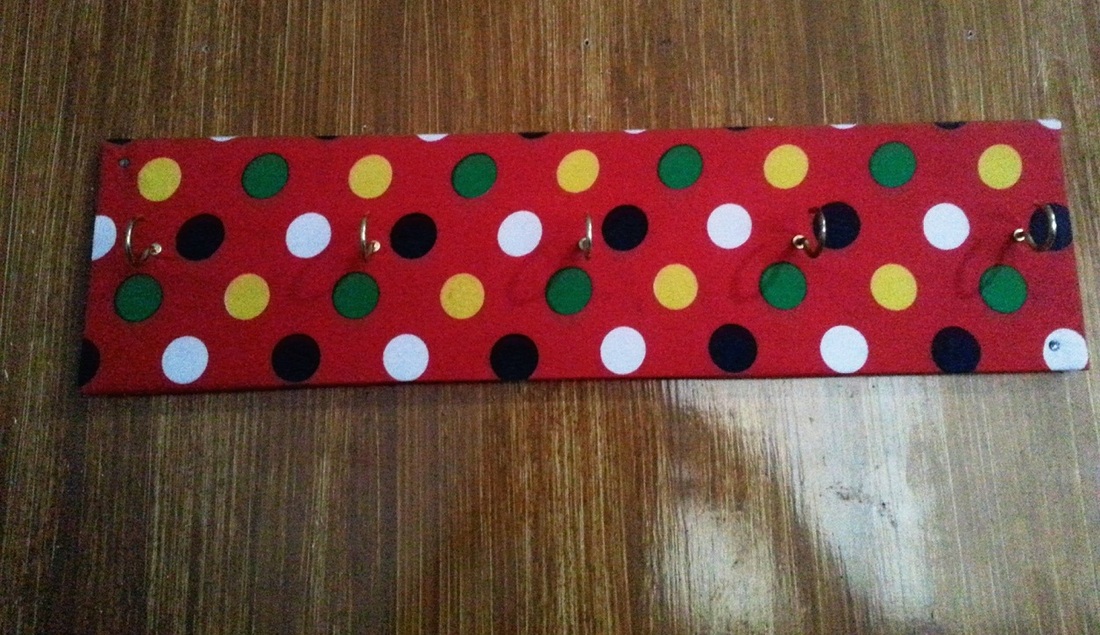
Voila! Here's the final outcome!
Not so final, though. I asked my dearest hubby to attach the hooks, to which he gladly did! :)
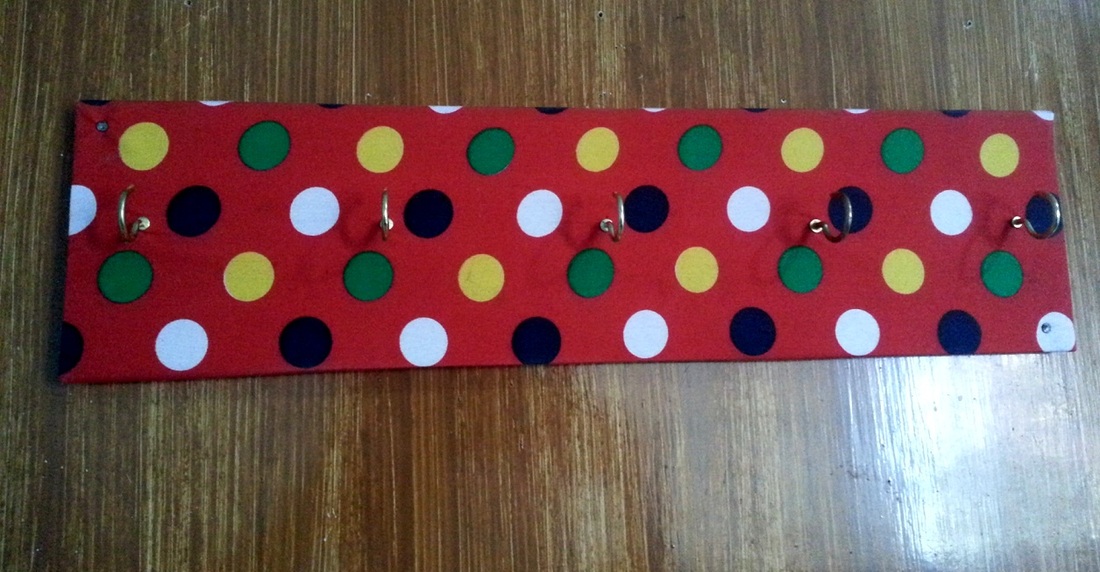
And here's the finished product!
With the size of wood I have (the one that was cut into two pieces), I can make two over-the-door hooks with a yard of fabric. And if you're going to ask how much did this item cost me, I'd say more or less P80 apiece. Very cheap, huh?
Until my next post!
Xoxo,
I'm a sucker for air fresheners, so I always make sure that there's one in the living room, one in the bathroom, and another one in the bedroom. Our home doesn't stink, but isn't it much nicer to live in a place where it always smells fresh? Besides, we have 2 pups that stay inside our home, so this is the more reason for me to become more conscious with the smell of our haven. :)
This DIY air freshener is soooo easy to do, and the good thing is that you will need only 3 items that are normally found in almost every home: rubbing alcohol, filtered/purified water and a high-quality essential oil. I said high quality, so the scent is sure to last long. I've tried a lot of brands of spray air fresheners, and some of them would release a very nice aroma that lasts only for a few seconds, so if you want the scent to linger a bit longer, I strongly recommend that you make use of a high-quality essential oil.
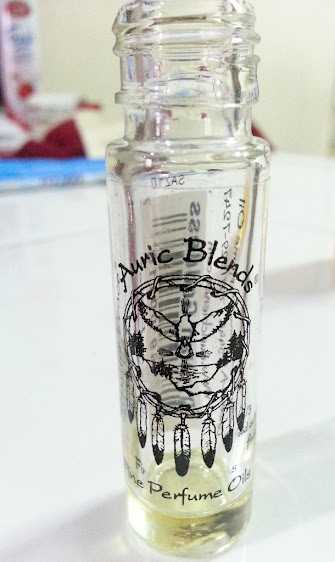
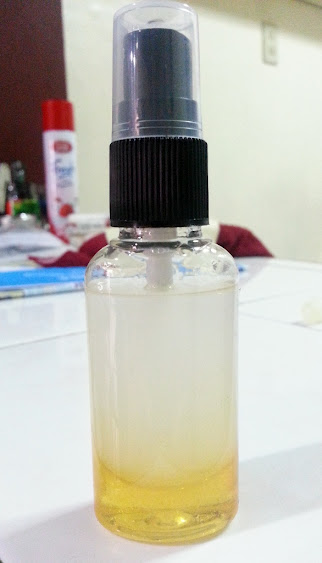
In my case, I used a fine perfume oil that has been stored in the cabinet for over a year, as I currently don't have an essential oil handy. This is what I used: The rubbing alcohol and water must have a 1:6 ratio, and about 20-40 drops of essential oil are needed. Mix them all together, and you now have an instant air freshener! I placed it in a small atomizer, and here is the finished product:
I just have to shake the bottle prior to using it, as the perfume oil settles underneath.
I noticed that the one I made gives off an aromatic scent that lasts long. As of writing this, I can still smell it, and it has been half an hour since I sprayed it in the living room area. This is why I highly suggest that you use a high-quality essential oil. The cost may be a bit higher, but it sure is going to be worth the purchase, I promise! :)
You can also use this on your linens to keep it sweet smelling. Your essential oil can be anything, depending on your preference. Personally, I like the mild-scented ones, such as lavender, peppermint and citrus (which I'll be purchasing next time to make another air freshener).
Xoxo,
|


 RSS Feed